第3部分:使用Orchard API-Part 3: Using the Orchard API
Introduction
介绍
This is part three of a four part course. It will get you started with a gentle introduction to extending Orchard at the code level. You will build a very simple module which contains a widget that shows an imaginary featured product.
这是四部分课程的第三部分。它将帮助您轻松介绍在代码级别扩展Orchard。您将构建一个非常简单的模块,其中包含一个显示虚构特色产品的小部件。
It will teach you some of the basic components of module development and also encourage you to use best-practices when developing for Orchard.
它将教您模块开发的一些基本组件,并鼓励您在开发Orchard时使用最佳实践。
If you haven't read the previous parts of this course then you can go back to the overview to learn about the Getting Started with Modules course.
如果您还没有阅读本课程的前几部分,那么您可以回到概述[了解模块入门课程](模块入门)。
Now that we have built the widget and expanded it to use database storage for it's configuration we will turn to the Orchard API to make some decisions via code.
现在我们已经构建了小部件并将其扩展为使用数据库存储进行配置,我们将转向Orchard API以通过代码做出一些决策。
Amending the widget through code
通过代码修改小部件
The second feature we have planned to add to the widget is some code that will detect when a user is viewing the featured product page and then make some changes to the display.
我们计划添加到窗口小部件的第二个功能是一些代码,用于检测用户何时查看特色产品页面,然后对显示进行一些更改。
At the moment the widget is displayed site-wide with a big green "Click here to view it" link. When the user is on the product page it doesn't make sense to show a link back to itself.
目前,小部件在站点范围内显示为绿色的“点击此处查看”链接。当用户在产品页面上时,显示返回自身的链接是没有意义的。
In the previous part we added a configurable item to the widget. The widget read that setting in and updated itself. The same code is run no matter where you embed the widget.
在上一部分中,我们向窗口小部件添加了一个可配置项。小部件读取该设置并自行更新。无论您在何处嵌入窗口小部件,都会运行相同的代码。
This time, we will expand the widget so that it is aware of its surroundings. When the page loads and the widget is asked to display, it will inspect the page as a whole, figure out what type of page it is on and then, if applicable, drill down to see what specific product page it's on.
这一次,我们将扩展小部件,以便了解其周围环境。当页面加载并要求显示窗口小部件时,它将检查整个页面,找出它所在的页面类型,然后(如果适用)深入查看它所在的特定产品页面。
This information will then be passed through to the view so that we can change the display on the fly.
然后,此信息将传递到视图,以便我们可以动态更改显示。
Setting up a ContentType to work with
设置要使用的ContentType
The admin dashboard is quite powerful. If you have been using Orchard for long you'll likely have set up your own content types within the Content Definition section of the admin dashboard.
管理仪表板非常强大。如果您已经使用Orchard很长时间,您可能已经在管理仪表板的“内容定义”部分中设置了自己的内容类型。

This section allows you to combine pre-existing content parts together to form a custom content type that can be displayed in your site.
此部分允许您将预先存在的内容部分组合在一起,以形成可在您的站点中显示的自定义内容类型。
It also has a section called Fields. When there isn't a content part that quite fits your needs you can turn to the Fields to add extra pieces of data to the content type on the fly.
它还有一个名为 Fields 的部分。如果没有完全符合您需求的内容部分,您可以转向字段,以便在运行时向内容类型添加额外的数据。
We are going to quickly build a Product content type which has some of the common core content parts; a title, a URL, a menu entry and some body text. We will also add in single text field called Product Id to detect which particular product is being viewed:
我们将快速构建一个“Product”内容类型,其中包含一些常见的核心内容部分;标题,URL,菜单条目和一些正文。我们还将添加名为“Product Id”的单个文本字段,以检测正在查看的特定产品:
- Navigate to the admin dashboard of your site.
1.导航到站点的管理仪表板。
- Click Content Definition in the menu down the side.
1.单击侧面菜单中的内容定义。
- Click Create new type.
1.单击创建新类型。
- Enter
Productfor theDisplay Name. This should automatically fill out theContent Type Idfield for you. Make sure theContent Type Idis also set toProduct:
1.输入Product作为Display Name。这应该会自动为您填写“内容类型ID”字段。确保Content Type Id也设置为Product:
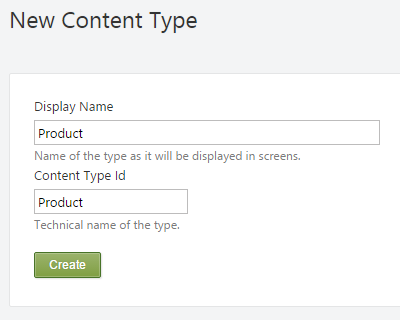
- Click Create.
1.单击创建。
- In the Add Parts to "Product" section tick the following parts:
1.在添加零件到“产品”部分,勾选以下部分:
   * Autoroute

   * Body

   * Menu

   * Title
- Click Save. You will be taken to the Edit Content Type page and you should see several messages from the Orchard notifier system:
1.单击保存。您将进入编辑内容类型页面,您应该会看到来自Orchard通知程序系统的几条消息:

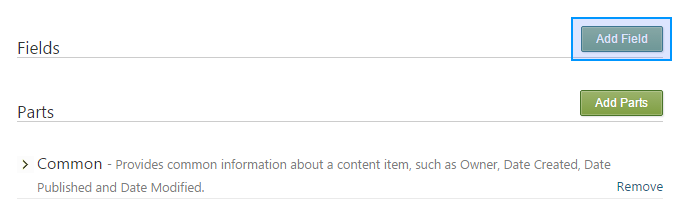
- Scroll down to the Fields section and then click the Add Field button:
1.向下滚动到 Fields 部分,然后单击 Add Field 按钮:
- On the Add New Field To "Product" page fill the form out like this:
1.在添加新字段到“产品”页面填写表格如下:
  * Display Name: `Product Id`

  * Technical Name: `ProductId`

  * Field Type: `Input Field`

- Click Save.
1.单击保存。
- The main Edit Content Type page will reopen. Just for completeness lets configure the field so that it is flagged as required. If you scroll to the Fields section you will see your new field is now listed. The small
>will expand out to show configuration properties for that field:
1.主要的编辑内容类型页面将重新打开。为了完整性,我们可以配置该字段,以便根据需要对其进行标记。如果滚动到 Fields 部分,您将看到现在列出了您的新字段。小```将展开以显示该字段的配置属性:
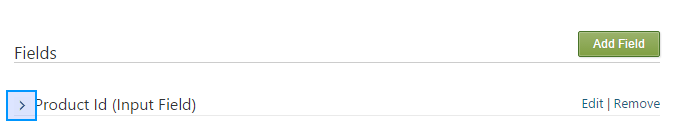
Click the `>` to expand the field configuration pane.
- Tick the Required check box:
1.勾选必填复选框:
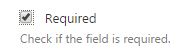
This will flag the field as requiring content when you create a new content item based off the `Product` content type. Orchard will automatically handle the validation for you and show a notification if the requirement is not met.
- To demonstrate the power of the configurable fields in Orchard we will also add a
Patternconstraint. TheProductIdshould be in all caps, with only letters or numbers, no spaces or other punctuation.
1.为了展示Orchard中可配置字段的强大功能,我们还将添加一个Pattern约束。 ProductId应该全部大写,只有字母或数字,没有空格或其他标点符号。
To describe this pattern to the system we will use something called a regular expression (often shortened to a regex). At first these patterns can seem complex but they offer a succinct way to describe text patterns.


To meet the requirement described above the regex will be: `^[A-Z0-9]+$`


In the Pattern field enter the pattern `^[A-Z0-9]+$`.
- Click Save.
1.单击保存。
In the next section we will create a demo product using this new content type.
在下一节中,我们将使用这种新的内容类型创建一个演示产品。
Regular Expression breakdown: If you're curious as to what different sections are in the regex we just used, it breaks down into this:
正则表达式细分:如果您对我们刚刚使用的正则表达式中的不同部分感到好奇,它会分解为:
^means match the start of the string (nothing before it)*
^表示匹配字符串的开头(之前没有)
[]means match the pattern of characters inside these brackets*
[]表示匹配这些括号内的字符模式
A-Zmeans match any character between uppercase A to uppercase Z*
A-Z表示匹配大写字母A到大写字母Z之间的任何字符
0-9means match any character between 0 to 9*
0-9表示匹配0到9之间的任何字符
+means match one or more repetitions of this character set. This means any combination of the letters and numbers but there needs to be at least one.*
+表示匹配此字符集的一个或多个重复。这意味着字母和数字的任意组合,但需要至少有一个。
$means match the end of the string (nothing after it)*
$表示匹配字符串的结尾(后面没有任何内容)
Prepare a sample product
准备样品
For this to work we need to create a dummy product that will act as the featured product:
为此,我们需要创建一个虚拟产品,作为特色产品:
- Navigate to the admin dashboard of your site.
1.导航到站点的管理仪表板。
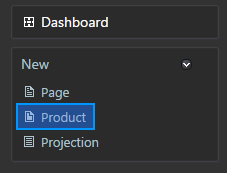
- In the New section of the menu click Product:
1.在菜单的新部分,单击产品:
- Set the
Titleof the page to "Sprocket 9000".
1.将页面的“标题”设置为“链轮9000”。
- Leave the
Permalinkblank.
1.将“永久链接”留空。
- You can optionally add some content in to the
Bodysection just for something to preview. Here is some Lorem Ipsum sample data:
1.您可以选择将一些内容添加到“正文”部分,以便预览。这是一些Lorem Ipsum样本数据:
    Curabitur non nulla sit amet nisl tempus convallis quis ac lectus. Nulla

    quis lorem ut libero malesuada feugiat. Sed porttitor lectus nibh.

    Vestibulum ante ipsum primis in faucibus orci luctus et ultrices posuere

    cubilia Curae; Donec velit neque, auctor sit amet aliquam vel, ullamcorper.
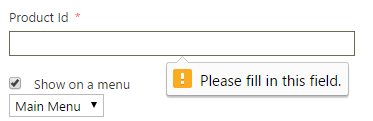
- The
Product Idis the custom field we created for the content type. Notice the red*which indicates a required field. If you try to create theProductwith a blankProduct Idyou will see a validation error:
1.“产品ID”是我们为内容类型创建的自定义字段。注意红色的“*”表示必填字段。如果您尝试使用空白的“产品ID”创建“产品”,您将看到验证错误:
If you try to enter an incorrect value that doesn't match the pattern we specified you will also see an error:
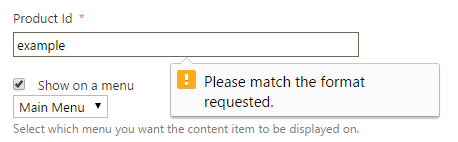
Enter `SPROCKET9000` into the `Product Id`.
- Tick the Show on a menu checkbox.
1.勾选菜单上的显示复选框。
- Leave the menu selection on Main Menu.
1.将菜单选项保留在主菜单上。
- In the Menu text enter the product name, "Sprocket 9000".
1.在菜单文本中输入产品名称“Sprocket 9000”。
- Click Publish Now.
1.单击立即发布。
The page will reload after Orchard has created the new content item in the background. You will see a green message saying "Your Page has been created":
在Orchard在后台创建新内容项后,该页面将重新加载。您将看到一条绿色消息,上面写着“您的页面已被创建”:

If you navigate back to the front-end of the website you should see a new menu item called Sprocket 9000. Clicking it will take you to the demo page you just created:
如果您导航回网站的前端,您会看到一个名为 Sprocket 9000 的新菜单项。单击它将转到刚刚创建的演示页面:

If the menu option doesn't appear on the page you probably clicked Save instead of Publish. When we created the content type is defaults to being marked as draftable. This means that you can save a copy in the system before it's made available publicly. Until you click the Publish Now button it won't show on the website.
如果页面上没有显示菜单选项,您可能会点击保存而不是发布。当我们创建内容类型时,默认为标记为_draftable_。这意味着您可以在系统公开之前将副本保存在系统中。在您单击 Publish Now 按钮之前,它将不会显示在网站上。
That's all the preparation we need to do before we can dive back into the code.
这是我们在重新回到代码之前需要做的所有准备工作。
Bonus Exercise: Go back to the admin dashboard and add in another product. It's not required but will mean that you can demonstrate the code is correctly identifying the product id later on.
奖励练习:返回管理仪表板并添加其他产品。这不是必需的,但意味着您可以证明代码在以后正确识别产品ID。
All of this could also have been done through code. We developed this content type via the admin dashboard to show that it's possible to work with content types via code whether created through classes in a module or in the admin dashboard.
所有这些也可以通过代码完成。我们通过管理仪表板开发了这种内容类型,以表明可以通过代码处理内容类型,无论是通过模块中的类还是通过管理仪表板创建的。
Bonus Exercise: Using the techniques learned in the first parts of this course, go back and create a clone of the
Productcontent type but create it through code. Name the new content typeProductViaCodeso that it doesn't clash with theProductwe have just created.奖金练习:使用本课程第一部分中学到的技巧,返回并创建“Product”内容类型的克隆,但通过代码创建。将新内容类型命名为“ProductViaCode”,以便它不会与我们刚创建的“Product”冲突。
Hint: The creating types from code documentation should point you in the right direction if you get stuck.
提示:如果遇到困难,[从代码创建类型](从代码创建类型)文档应指向正确的方向。
Writing code against the Orchard API
编写针对Orchard API的代码
At the moment the widget is displayed site-wide with a big green "Click here to view it" link. When the user is on the featured product page it doesn't make sense to show a link back to itself.
目前,小部件在站点范围内显示为绿色的“点击此处查看”链接。当用户在特色产品页面上时,显示返回自身的链接是没有意义的。
We're going to use Orchard's API so that when the widget is asked to display itself (in the driver) it will examine the current page that's being displayed (the content item), check if it's on a product page (content type of Product) and then check the product id of the product page to see if it's the current featured product (the ProductId field contains the product).
我们将使用Orchard的API,以便在要求窗口小部件显示时(在驱动程序中)它将检查当前正在显示的页面(内容项),检查它是否在产品页面上(内容类型为产品)然后检查产品页面的产品ID,看它是否是当前特色产品(ProductId字段包含产品)。
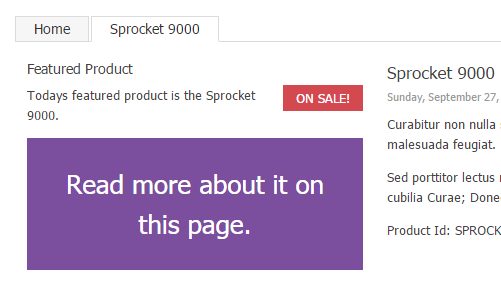
For the sake of visual comparison we will swap the green "Click here to view it" button out with a purple box that says "Read more about it on this page".
为了进行视觉比较,我们将交换绿色的“点击此处查看”按钮,并带有一个紫色框,上面写着“在此页面上阅读更多相关信息”。
Expanding out the display shape lambda
扩展显示形状lambda
So, based on this blueprint of our plans, how do we take the first step? The decision about what the module should display when it's asked to comes from the code within the driver class. The Display() method in the FeaturedProductDriver.cs class currently looks like this:
那么,根据我们计划的蓝图,我们如何迈出第一步呢?关于模块在被要求来自驱动程序类中的代码时应显示的内容的决定。 FeaturedProductDriver.cs类中的Display()方法目前如下所示:
protected override DriverResult Display(FeaturedProductPart part,

  string displayType, dynamic shapeHelper) {

    return ContentShape("Parts_FeaturedProduct",

      () => shapeHelper.Parts_FeaturedProduct());

}
The shapeHelper takes a lambda as it's parameter (() => shapeHelper.Parts_FeaturedProduct()) and because the code being run at the moment is just a single line statement it is using a short form version of it. To give ourselves some room to code we can expand out the lambda so that it wraps the code in curly braces and returns a shape at the end.
shapeHelper接受一个lambda作为它的参数(()=> shapeHelper.Parts_FeaturedProduct()),因为此刻运行的代码只是一个单行语句,它使用的是短格式版本。为了给自己一些代码空间,我们可以扩展lambda,以便将代码包装在花括号中并在最后返回一个形状。
In the case of our current Display() method the code would go from this:
在我们当前的Display()方法的情况下,代码将来自:
return ContentShape("Parts_FeaturedProduct",

  () => shapeHelper.Parts_FeaturedProduct());
To this:
对此:
return ContentShape("Parts_FeaturedProduct", () => { // curly brace here


    // extra space to write additional lines of code here


    return shapeHelper.Parts_FeaturedProduct(); // return keyword and semicolon

}); // curly brace here
An alternative solution to expanding out this Display() method would have been to do our preparation at the start of the method, something like this:
扩展这个Display()方法的另一种解决方案是在方法的开头做我们的准备,如下所示:
protected override DriverResult DisplayCat(FeaturedProductPart part,

  string displayType, dynamic shapeHelper) {

    // extra code here

    return ContentShape("Parts_FeaturedProduct",

      () => shapeHelper.Parts_FeaturedProduct());

}
What's the difference and why is this a bad idea? The Display() method gets called to prepare the shapes each time a visitor requests a page. With the modularity of the Orchard code you might still end up having something else on the page influencing its display so that the shape doesn't make it to the final output.
有什么区别,为什么这是一个坏主意?每次访问者请求页面时,都会调用Display()方法来准备形状。使用Orchard代码的模块化,您可能最终会在页面上出现影响其显示的其他内容,这样形状就无法进入最终输出。
When the setup code is passed within the lambda it doesn't get run until it's actually needed. This means that if you need to do some "expensive" setup code you don't want to run it unless you're sure it's going to be used. In this context expensive means heavy resource usage (it could require complicated database calls or data crunching) or time consuming (you might rely on calling a 3rd party web service to get some information).
当设置代码在lambda中传递时,它在实际需要之前不会运行。这意味着如果你需要做一些“昂贵”的设置代码,你不想运行它,除非你确定它会被使用。在这种情况下,昂贵意味着占用大量资源(可能需要复杂的数据库调用或数据处理)或耗时(您可能依赖于调用第三方Web服务来获取某些信息)。
You don't want to waste your resources and slow down the page being displayed by running unnecessary setup code so that's why you should use the first solution above. It keeps all the setup code inside the curly braces of the lambda and only runs it when the shape is actually being displayed.
您不希望浪费资源并通过运行不必要的设置代码来减慢显示的页面,这就是为什么您应该使用上面的第一个解决方案。它将所有设置代码保存在lambda的花括号中,并仅在实际显示形状时运行它。
Let's implement what we have discussed so far:
让我们实现到目前为止所讨论的内容:
- Open up the
FeaturedProductDriver.csfile located in the.\Drivers\folder.
1.打开位于。\\ Drivers \\文件夹中的FeaturedProductDriver.cs文件。
- Replace the
Display()method with the following:
1.用以下代码替换Display()方法:
    protected override DriverResult Display(FeaturedProductPart part,

      string displayType, dynamic shapeHelper) {

        return ContentShape("Parts_FeaturedProduct", () => {

          // extra space to write additional lines of code here

          return shapeHelper.Parts_FeaturedProduct();

        });

    }
Getting the current ContentItem being displayed
获取当前正在显示的ContentItem
Getting the current ContentItem from within the widget driver means using some of the built-in Orchard classes.
从小部件驱动程序中获取当前的“ContentItem”意味着使用一些内置的Orchard类。
To look up the ContentItem we need to get the Id of the content out of the ASP.NET MVC route data, then convert this into a content item by requesting it via the content manager.
要查找ContentItem,我们需要从ASP.NET MVC路由数据中获取内容的Id,然后通过内容管理器请求将其转换为内容项。
We could add a public property to the driver which looked like this:
我们可以向驱动程序添加一个公共属性,如下所示:
private IContent _currentContent = null;

private IContent CurrentContent {

  get {

    if (_currentContent == null) {

      var itemRoute = _aliasService.Get(_workContextAccessor.GetContext()

        .HttpContext.Request.AppRelativeCurrentExecutionFilePath

        .Substring(1).Trim('/'));


        _currentContent = _contentManager.Get(Convert.ToInt32(itemRoute["Id"]));

    }
    return _currentContent;

  }

}
But where do all of these supporting classes like _aliasService and _contentManager come from?
但是所有这些支持类如_aliasService和_contentManager来自何处?
Dependency injection in Orchard
Orchard中的依赖注入
The modular design of Orchard means that each feature of Orchard tries to be as independent as it can. This means that when the Widget is building its shape it doesn't automatically know about the wider context of the page being requested. It is a specialized unit of code which completes its task as efficiently and simply as possible.
Orchard的模块化设计意味着Orchard的每个功能都尽可能独立。这意味着当Widget构建其形状时,它不会自动知道所请求页面的更广泛的上下文。它是一个专门的代码单元,可以尽可能高效,简单地完成任务。
When it's required, the module can request access to parts of the larger Orchard system through the use of Orchard's service classes.
当需要时,模块可以通过使用Orchard的服务类请求访问较大的Orchard系统的部分。
Orchard provides service classes that allow you to leverage Orchard features at the code level. When you need to do things like pulling content out of the content manager, displaying notifications, logging or working with the URL, you can turn to these services classes.
Orchard提供的服务类允许您在代码级别利用Orchard功能。当您需要执行诸如从内容管理器中提取内容,显示通知,记录或使用URL等操作时,您可以转到这些服务类。
These classes are grouped together by a common inheritance; they implement IDependency. When you need one of them you simply need to add it to your constructor and an instance will be injected into your class at run-time. This is called dependency injection. You can get many frameworks that will enable this but in Orchard the service is provided by Autofac.
这些类通过公共继承组合在一起;他们实现了“IDependency”。当你需要其中一个时,你只需要将它添加到你的构造函数中,一个实例将在运行时注入你的类。这称为依赖注入。您可以获得许多可以实现此功能的框架,但在Orchard中,服务由Autofac提供。
Each of these support classes specialize in providing a single feature. This means you only open communication channels to the main system for the parts which you actually need, keeping the system decoupled.
这些支持类中的每一个都专注于提供单个功能。这意味着您只需打开主系统的通信通道,以获得实际需要的部件,从而保持系统解耦。
Constructor injection
构造函数注入
When you want to get access to one of Orchard's service classes you need to add a reference to the class to the default constructor. However, instead of requesting the class directly you will always work with the interface that the service you want implements.
当您想要访问Orchard的某个服务类时,您需要将该类的引用添加到默认构造函数中。但是,不是直接请求类,而是始终使用要实现的服务的接口。
The advantage of dependency injection is that you don't depend on concrete implementations (the actual class). Working with an interface means that you or a module can swap out the implementation of a specific class if it needs to. By always working with an interface instead of the actual service it means you don't need to know which particular implementation you are working with, preventing you from being tied to it.
依赖注入的优点是您不依赖于具体实现(实际类)。使用接口意味着您或模块可以根据需要替换特定类的实现。通过始终使用接口而不是实际服务,这意味着您不需要知道正在使用哪个特定实现,从而阻止您与它绑定。
So if you wanted a copy of the content manager then you would request IContentManager contentManager in your constructor.
因此,如果您需要内容管理器的副本,那么您将在构造函数中请求IContentManager contentManager。
The standard process for incorporating a new service into the class is as follows (you don't need to do this now):
将新服务合并到类中的标准过程如下(您现在不需要这样做):
- Create a new private, read-only variable to hold the injected class. It should start with an underscore like
_contentManager.
1.创建一个新的私有只读变量来保存注入的类。它应该以像_contentManager这样的下划线开头。
<font color=#0099ff size=4 face="黑体"></font>
- Update the default constructor to include the service as a parameter.
1.更新默认构造函数以将服务作为参数包含在内。
- Assign the injected class to the private variable for later use.
1.将注入的类分配给私有变量以供以后使用。
We will use this three step theory in the next section.
我们将在下一节中使用这个三步理论。
Implementing CurrentContent
实现CurrentContent
Based on the service requirements in our demo implementation above of the CurrentContent property we know that we will need IContentManager, IWorkContextAccessor, IAliasService to turn the route data into an instance of the current ContentItem.
根据我们上面的'CurrentContent属性的演示实现中的服务要求,我们知道我们需要IContentManager,IWorkContextAccessor,IAliasService来将路由数据转换为当前ContentItem`的实例。
Taking what we have learned about dependency injection and knowing our service requirements we can now implement the next stage of the FeaturedProductDriver class:
根据我们对依赖注入的了解和了解我们的服务需求,我们现在可以实现FeaturedProductDriver类的下一个阶段:
- Open up the
FeaturedProductDriver.csfile located in the.\Drivers\folder.
1.打开位于。\\ Drivers \\文件夹中的FeaturedProductDriver.cs文件。
- Add the following properties to the top of the
FeaturedProductDriverclass:
1.将以下属性添加到FeaturedProductDriver类的顶部:
    private readonly IContentManager _contentManager;

    private readonly IWorkContextAccessor _workContextAccessor;

    private readonly IAliasService _aliasService;
`IAliasService` will need its namespace but when you try to add it via `Ctrl-.` you will see Visual Studio doesn't know where to find it.
We need to add a reference and update the dependencies of our module.
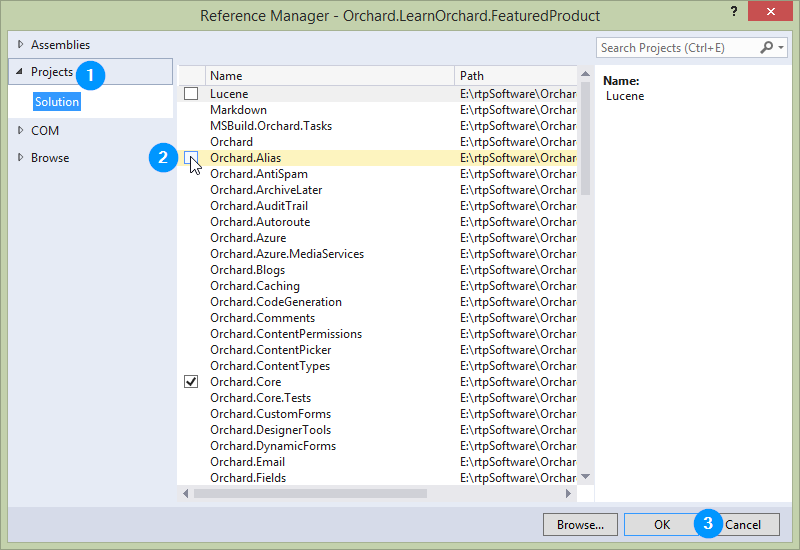
- Right click on the References entry in the module's project within the Solution Explorer window and choose Add Reference....
1.右键单击 Solution Explorer 窗口中模块项目中的 References 条目,然后选择 Add Reference ... 。
- Click the Projects tab on the left.
Orchard.Aliasshould already be visible. Hover your mouse over it and a checkbox will appear. Click the checkbox forOrchard.Alias. Click OK.
1.单击左侧的 Projects 选项卡。 Orchard.Alias应该已经可见了。 _Hover_将鼠标悬停在它上面,会出现一个复选框。单击“Orchard.Alias”的复选框。单击确定。
- Now we have to update our dependencies straight away so they don't get forgotten. Open up the
Module.txtfile located in the project root.
1.现在我们必须立即更新我们的依赖项,这样它们就不会被遗忘。打开位于项目根目录中的Module.txt文件。
- The last line of the file should contain the
Orchard.Widgetsdependency that we created in part one. This field will take a comma separated list detailing each dependency a modules has.
1.文件的最后一行应该包含我们在第一部分中创建的Orchard.Widgets依赖项。该字段将采用逗号分隔的列表,详细说明模块具有的每个依赖项。
Update the line to add `Orchard.Alias`, ensuring that the line keeps its indentation, so that the line now looks like this:


            Dependencies: Orchard.Widgets, Orchard.Alias
- Go back to the
FeaturedProductDriver.csfile. You can now add the missing namespace viaCtrl-..
1.返回FeaturedProductDriver.cs文件。您现在可以通过Ctrl-.添加缺少的命名空间。
- Below the private properties, add in a default constructor:
1.在私有属性下面,添加一个默认构造函数:
    public FeaturedProductDriver(IContentManager contentManager,

      IWorkContextAccessor workContextAccessor,

      IAliasService aliasService) {

        _contentManager = contentManager;

        _workContextAccessor = workContextAccessor;

        _aliasService = aliasService;

    }


 You can see that we are following the standard pattern of defining a private property, adding an instance to the constructor parameters and then assigning the injected class to the private variable.
- The Driver now has all of the requirements implemented to support the
CurrentContentproperty.
1. Driver现在已经实现了支持CurrentContent属性的所有要求。
Add this code in between the first batch of private properties and the constructor:
    private IContent _currentContent = null;

    private IContent CurrentContent {

      get {

        if (_currentContent == null) {

          var itemRoute = _aliasService.Get(_workContextAccessor.GetContext()

            .HttpContext.Request.AppRelativeCurrentExecutionFilePath

            .Substring(1).Trim('/'));

          _currentContent = _contentManager.Get(Convert.ToInt32(itemRoute["Id"]));

        }

        return _currentContent;

      }

    }
- If you have cleaned up your
usingstatements then you might need to add a namespace usingCtrl-.for theConvert.ToInt32().
1.如果你已经清理了using语句,那么你可能需要使用Ctrl-.为Convert.ToInt32()添加命名空间。
The complete FeaturedProductDriver.cs should now look like this:
现在,完整的FeaturedProductDriver.cs应如下所示:
using System;

using Orchard.Alias;

using Orchard.ContentManagement;

using Orchard.ContentManagement.Drivers;

using Orchard.LearnOrchard.FeaturedProduct.Models;


namespace Orchard.LearnOrchard.FeaturedProduct.Drivers {

  public class FeaturedProductDriver : ContentPartDriver<FeaturedProductPart>{

    private readonly IContentManager _contentManager;

    private readonly IWorkContextAccessor _workContextAccessor;

    private readonly IAliasService _aliasService;


    private IContent _currentContent = null;

    private IContent CurrentContent {

      get {

        if (_currentContent == null) {

          var itemRoute = _aliasService.Get(_workContextAccessor.GetContext()

            .HttpContext.Request.AppRelativeCurrentExecutionFilePath

            .Substring(1).Trim('/'));


          _currentContent = _contentManager.Get(

            Convert.ToInt32(itemRoute["Id"]));

        }

        return _currentContent;

      }

    }


    public FeaturedProductDriver(IContentManager contentManager,

      IWorkContextAccessor workContextAccessor,

      IAliasService aliasService) {

        _contentManager = contentManager;

        _workContextAccessor = workContextAccessor;

        _aliasService = aliasService;

    }


    protected override DriverResult Display(FeaturedProductPart part,

      string displayType, dynamic shapeHelper) {

        return ContentShape("Parts_FeaturedProduct", () => {

          // extra space to write additional lines of code here

          return shapeHelper.Parts_FeaturedProduct();

        });

    }


    protected override DriverResult Editor(FeaturedProductPart part,

      dynamic shapeHelper) {

        return ContentShape("Parts_FeaturedProduct_Edit",

          () => shapeHelper.EditorTemplate(

            TemplateName: "Parts/FeaturedProduct",

            Model: part,

            Prefix: Prefix));

    }


    protected override DriverResult Editor(FeaturedProductPart part,

      IUpdateModel updater, dynamic shapeHelper) {

        updater.TryUpdateModel(part, Prefix, null, null);

        return Editor(part, shapeHelper);

    }

  }

}
Passing data to the view
将数据传递给视图
We have already passed data to the view in previous parts but we didn't stop to examine it in detail:
我们已经将数据传递给前面部分的视图,但我们没有停下来详细检查它:
return ContentShape("Parts_FeaturedProduct_Edit",

  () => shapeHelper.EditorTemplate(

    TemplateName: "Parts/FeaturedProduct",

    Model: part,

    Prefix: Prefix));
These parameters are dynamic which means you can add any parameter you want. This means that we could update the Display() method to pass through a value by changing the code to:
这些参数是动态的,这意味着您可以添加所需的任何参数。这意味着我们可以更新Display()方法,通过将代码更改为:来传递值:
shapeHelper.Parts_FeaturedProduct(FavoriteColor: "Green");
The view would then be able to use this by using @Model.FavoriteColor.
然后,视图可以通过使用@ Model.FavoriteColor来使用它。
We want to implement some logic into the Display() method which will result in answering the question IsOnFeaturedProductPage so that this can be passed through to the view.
我们想在Display()方法中实现一些逻辑,这将导致回答问题IsOnFeaturedProductPage,以便可以将其传递给视图。
We will do this by declaring bool isOnFeaturedProductPage = false; at the top of the method. It will be given a default value of false to start with. Then throughout the next few sections we will perform tests to see if it is in fact true.
我们将通过在方法顶部声明bool isOnFeaturedProductPage = false;来完成此操作。它将以一个默认值false开头。然后在接下来的几节中我们将进行测试,看看它是否真的是“真实”。
Modify the first Display() method by following these steps:
按照以下步骤修改第一个Display()方法:
- Open up the
FeaturedProductDriver.csfile located in the.\Drivers\folder.
1.打开位于。\\ Drivers \\文件夹中的FeaturedProductDriver.cs文件。
- Locate the
Display()method and replace it with the following:
1.找到Display()方法并将其替换为以下内容:
    protected override DriverResult Display(FeaturedProductPart part,

      string displayType, dynamic shapeHelper) {

        return ContentShape("Parts_FeaturedProduct", () => {

          bool isOnFeaturedProductPage = false;

          // detecting current product code will go here

          return shapeHelper.Parts_FeaturedProduct(

            IsOnFeaturedProductPage: isOnFeaturedProductPage);

        });

    }
This has laid the groundwork for us. The next piece of code will detect the content type, read the product id and update isOnFeaturedProductPage if required.
这为我们奠定了基础。下一段代码将检测内容类型,读取产品ID并在需要时更新isOnFeaturedProductPage。
Detecting the content type
检测内容类型
The CurrentContent property that we implemented doesn't exactly return the current content item, it returns an IContent. This contains a property called ContentItem which then gives us access to everything related to the current content item.
我们实现的CurrentContent属性并不完全返回当前内容项,它返回一个IContent。它包含一个名为ContentItem的属性,然后它允许我们访问与当前内容项相关的所有内容。
You can explore the ContentItem class by navigating around using IntelliSense, or by navigating to the class itself with F12. There are lots of interesting properties to use.
您可以通过使用IntelliSense导航来探索ContentItem类,或者使用F12导航到类本身。有许多有趣的属性可供使用。
The content type is stored as a string inside a ContentTypeDefinition property called TypeDefinition. You can get to it using this notation:
内容类型作为字符串存储在名为TypeDefinition的ContentTypeDefinition属性中。你可以使用这种表示法来实现它:
var itemTypeName = CurrentContent.ContentItem.TypeDefinition.Name;
The itemTypeName variable will then contain a string version of the content type. The Product content type was created via the admin dashboard. This means that there isn't a concrete class for us to use in a typeof(T).Name call so we will have to work with the string "Product" when we're checking the type of the current content item.
然后,itemTypeName变量将包含内容类型的字符串版本。 Product内容类型是通过管理仪表板创建的。这意味着我们没有在typeof(T).Name调用中使用的具体类,因此当我们检查当前内容项的类型时,我们将不得不使用字符串“Product”。
Putting the code together is just a case of a standard .NET string comparison:
将代码放在一起只是标准.NET字符串比较的一种情况:
- Open up the
FeaturedProductDriver.csfile located in the.\Drivers\folder.
1.打开位于。\\ Drivers \\文件夹中的FeaturedProductDriver.cs文件。
- Locate the
Display()method and replace it with the following:
1.找到Display()方法并将其替换为以下内容:
    protected override DriverResult Display(FeaturedProductPart part,

      string displayType, dynamic shapeHelper) {

        return ContentShape("Parts_FeaturedProduct", () => {

          bool isOnFeaturedProductPage = false;

          // new code

          if(CurrentContent != null) {

            var itemTypeName = CurrentContent.ContentItem.TypeDefinition.Name;

            if (itemTypeName.Equals("Product",

              StringComparison.InvariantCultureIgnoreCase)) {

              // final product id check will go here

            }

          }

          // end of new code

          return shapeHelper.Parts_FeaturedProduct(

            IsOnFeaturedProductPage: isOnFeaturedProductPage);

        });

    }


 You don't need to include the comments in your module, they are just for guidance.
Using fields
使用字段
Fields are a great way to quickly surface data. We added one to our Product content type in the admin dashboard in just a minute or two. We didn't need write a ContentPart or work with Visual Studio at all. When creating websites in Orchard you will find plenty of occasions where using a field is appropriate.
字段是快速显示数据的好方法。我们在一两分钟内在管理仪表板中为我们的Product内容类型添加了一个。我们根本不需要编写ContentPart或使用Visual Studio。在Orchard中创建网站时,您会发现很多场合使用字段是合适的。
If you look in forums and chat rooms you will find that they've been known to confuse first time users.
如果你在论坛和聊天室中查看,你会发现他们已经知道会混淆第一次使用者。
It's not that they are complicated to use, far from it. It's just that the correct way to access them isn't discoverable through IntelliSense so developers hit a brick wall.
并不是说它们使用起来很复杂,远非如此。只是通过IntelliSense无法发现访问它们的正确方法,因此开发人员遇到了障碍。
We are going to cover the two important things you need to learn about fields so that you find them just as easy to work with in code as you have done in the admin dashboard.
我们将介绍您需要了解的有关字段的两个重要事项,以便您可以像在管理仪表板中一样轻松地在代码中使用它们。
The first important thing to understand is: Fields are always in a ContentPart.
要理解的第一个重要事项是:Fields总是*在'ContentPart`中。
To be fair, it looked like you had just created the field outside of the content type:
公平地说,看起来你刚刚创建了内容类型之外的字段:

But in truth, Orchard created an invisible ContentPart for you and attached those fields to that. The name of that content part is the name of the content type. So for our Product content type, the content part would be Product. For a HtmlWidget it would be HtmlWidget, if you added a field to the Page you would access it with Page.
但实际上,Orchard为你创建了一个看不见的“ContentPart”并将这些字段附加到那里。该内容部分的名称是内容类型的名称。因此,对于我们的Product内容类型,内容部分将是Product。对于HtmlWidget,它将是HtmlWidget,如果你向Page添加了一个字段,你将使用Page访问它。
So the way to access our ProductId field which is on the ContentType of Product we would write:
那么访问我们的ProductId字段的方法就在Product的ContentType上我们写的:
var productId = CurrentContent.ContentItem.Product.ProductId.Value;
Where did the .Value come from? Well, your field is not just a simple string. You defined it as a "Text Field" when you filled out the form. This maps to the Orchard.Fields.Fields.InputField class and you can access its data through the .Value property.
.Value来自哪里?那么,你的领域不仅仅是一个简单的字符串。填写表格时,您将其定义为“文本字段”。这映射到Orchard.Fields.Fields.InputField类,您可以通过.Value属性访问它的数据。
As you build up your skills as an Orchard module developer one of the important ones will be digging through the code to discover this sort of thing for yourself. As I was writing this I didn't know what the class was called. To find it out I put a breakpoint on the line of code, started a debug session and inspected the field to see what class it was and how to get at its data.
当你建立自己作为Orchard模块开发人员的技能时,其中一个重要的人将会挖掘代码来为自己发现这类事情。在我写这篇文章的时候,我不知道上课的内容。为了找到它,我在代码行上放置一个断点,启动一个调试会话并检查该字段以查看它是什么类以及如何获取其数据。
This is a useful skill to have in your repertoire when working with Orchard but in this case you also have a useful resource that has been put together by Sebastien Ros. He has created an Orchard Cheatsheet which covers common properties that you might want to access on each of the built-in Orchard content fields.
在与Orchard合作时,这是一项非常有用的技巧,但在这种情况下,您还拥有Sebastien Ros整合的有用资源。他创建了一个[Orchard Cheatsheet](http://sebastienros.github.io/CheatSheet/),其中包含您可能希望在每个内置Orchard内容字段中访问的常用属性。
The second important thing to understand with accessing fields is that if you tried that line above you wouldn't get very far, and this is the reason why new developers have had so much trouble with it. The fields are injected into the class at run-time using .NET dynamic features.
访问字段时要理解的第二个重要事项是,如果你在上面尝试过这一行,你就不会走得太远,这也是新开发人员遇到这么多麻烦的原因。这些字段在运行时使用.NET动态功能注入到类中。
This means you don't get IntelliSense for dynamic properties. It also means that unless the class is marked as dynamic the code won't compile. So before you can use code to access your field you need to cast your ContentItem to dynamic:
这意味着您无法获得动态属性的IntelliSense。它还意味着除非该类被标记为“动态”,否则代码将无法编译。因此,在使用代码访问字段之前,需要将ContentItem强制转换为dynamic:
var dynamicContentItem = (dynamic)CurrentContent.ContentItem;

var itemProductId = dynamicContentItem.Product.ProductId.Value;
Once you have the product id in a string it's just a case of comparing it against the known value and setting isOnFeaturedProductPage = true if it's a match:
一旦你在一个字符串中有了产品id,它只是将它与已知值进行比较并设置isOnFeaturedProductPage = true如果它是匹配的情况:
- Open up the
FeaturedProductDriver.csfile located in the.\Drivers\folder.
1.打开位于。\\ Drivers \\文件夹中的FeaturedProductDriver.cs文件。
- Locate the
Display()method and replace it with the following:
1.找到Display()方法并将其替换为以下内容:
    protected override DriverResult Display(FeaturedProductPart part,

      string displayType, dynamic shapeHelper) {

        return ContentShape("Parts_FeaturedProduct", () => {

          bool isOnFeaturedProductPage = false;

          var itemTypeName = CurrentContent.ContentItem.TypeDefinition.Name;

          if (itemTypeName.Equals("Product",

            StringComparison.InvariantCultureIgnoreCase)) {

              // new code

              var dynamicContentItem = (dynamic)CurrentContent.ContentItem;

              var itemProductId = dynamicContentItem.Product.ProductId.Value;

              if(itemProductId.Equals("SPROCKET9000",

                StringComparison.InvariantCulture)) {

                  isOnFeaturedProductPage = true;

              }

              // end of new code

          }

          return shapeHelper.Parts_FeaturedProduct(

            IsOnFeaturedProductPage: isOnFeaturedProductPage);

        });

    }
That's all the code that's needed to detect the page content type and check the product id field.
这就是检测页面内容类型和检查产品ID字段所需的所有代码。
You might have noticed that this time around we just used StringComparison.InvariantCulture. This is because we have already enforced uppercase so we can be sure that the case doesn't conflict with the test value.
您可能已经注意到,这次我们只使用了StringComparison.InvariantCulture。这是因为我们已经强制执行大写,因此我们可以确保案例不会与测试值冲突。
Now that we have completed the code to identify the current page and passed that through to the shape it will be accessible in the view as @model.IsOnFeaturedProductPage.
现在我们已经完成了识别当前页面并将其传递给形状的代码,它将在视图中作为“@ model.IsOnFeaturedProductPage”访问。
In the last section of this lesson we will update the view to make use of this information.
在本课程的最后一节中,我们将更新视图以使用此信息。
Updating the view
更新视图
Once you have done the work in the driver it's simple for you to make decisions based on the value passed to the model. In part two we looked at using conditionals and reading values from the Model.
一旦完成了驱动程序中的工作,您就可以根据传递给模型的值做出决策。在第二部分中,我们研究了使用条件和从“模型”中读取值。
Now we are going to re-use these skills:
现在我们将重用这些技能:
- Open up the view file located at
.\Views\Parts\FeaturedProduct.cshtml
1.打开位于。\\ Views \\ Parts \\ FeaturedProduct.cshtml的视图文件
- Copy this CSS snippet into the
<style>block at the top of the view:
1.将此CSS片段复制到视图顶部的<style>块中:
    .box-purple {

      padding: 1em;

      text-align: center;

      color: #fff;

      background-color: #7b4f9d;

      font-size: 2em;

      display: block;

    }
- Find this line of markup (it should be the last line in the view):
1.找到这一行标记(它应该是视图中的最后一行):
    <p><a href="~/sprocket-9000" class="btn-green">Click here to view it</a></p>


 And replace it with:


    @if (!Model.IsOnFeaturedProductPage) {

      <p>

        <a href="~/sprocket-9000" class="btn-green">Click here to view it.</a>

      </p>

    } else {

      <p class="box-purple">Read more about it on this page.</p>

    }
- Save and close the file.
1.保存并关闭文件。
For reference, your complete FeaturedProductDriver.cs class should now look like this:
作为参考,您的完整FeaturedProductDriver.cs类现在应如下所示:
using System;

using Orchard.Alias;

using Orchard.ContentManagement;

using Orchard.ContentManagement.Drivers;

using Orchard.LearnOrchard.FeaturedProduct.Models;


namespace Orchard.LearnOrchard.FeaturedProduct.Drivers {

    public class FeaturedProductDriver : ContentPartDriver<FeaturedProductPart> {

        private readonly IContentManager _contentManager;

        private readonly IWorkContextAccessor _workContextAccessor;

        private readonly IAliasService _aliasService;


        private IContent _currentContent = null;

        private IContent CurrentContent {

            get {

                if (_currentContent == null) {

                    var itemRoute =

                      _aliasService.Get_workContextAccessor.GetContext()

                        .HttpContext.Request.AppRelativeCurrentExecutionFilePath

                        .Substring(1).Trim('/'));

                    _currentContent = _contentManager.Get(

                      Convert.ToInt32(itemRoute["Id"]));

                }

                return _currentContent;

            }

        }


        public FeaturedProductDriver(IContentManager contentManager,

          IWorkContextAccessor workContextAccessor, IAliasService aliasService) {

            _contentManager = contentManager;

            _workContextAccessor = workContextAccessor;

            _aliasService = aliasService;

        }


        protected override DriverResult Display(FeaturedProductPart part,

          string displayType, dynamic shapeHelper) {

            return ContentShape("Parts_FeaturedProduct", () => {

                bool isOnFeaturedProductPage = false;


                if (CurrentContent != null) {

                    var itemTypeName =

                      CurrentContent.ContentItem.TypeDefinition.Name;


                    if (itemTypeName.Equals("Product",

                      StringComparison.InvariantCultureIgnoreCase)) {


                        var dynamicContentItem =

                          (dynamic)CurrentContent.ContentItem;

                        var itemProductId =

                          dynamicContentItem.Product.ProductId.Value;


                        if (itemProductId.Equals("SPROCKET9000",

                          StringComparison.InvariantCulture)) {

                            isOnFeaturedProductPage = true;

                        }

                    }

                }


                return shapeHelper.Parts_FeaturedProduct(

                  IsOnFeaturedProductPage: isOnFeaturedProductPage);

            });

        }


        protected override DriverResult Editor(FeaturedProductPart part,

          dynamic shapeHelper) {

            return ContentShape("Parts_FeaturedProduct_Edit",

              () => shapeHelper.EditorTemplate(

                TemplateName: "Parts/FeaturedProduct",

                Model: part,

                Prefix: Prefix));

        }


        protected override DriverResult Editor(FeaturedProductPart part,

          IUpdateModel updater, dynamic shapeHelper) {

            updater.TryUpdateModel(part, Prefix, null, null);

            return Editor(part, shapeHelper);

        }

    }

}
Trying the module out in Orchard
在Orchard尝试模块
This is the part where it all pays off. If you run Orchard in the browser you will see the updates we have been working on in action:
这是一切都得到回报的部分。如果您在浏览器中运行Orchard,您将看到我们一直在努力的更新:
- Within Visual Studio, press
Ctrl-F5on your keyboard to start the website without debugging enabled (it's quicker and you can attach the debugger later if you need it).
1.在Visual Studio中,按键盘上的“Ctrl-F5”启动网站而不启用调试(它更快,如果需要,可以稍后附加调试器)。
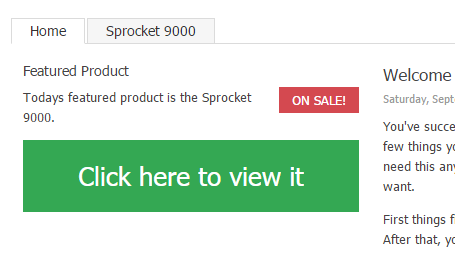
- You will start off on the homepage. The widget should look the same as it did at the end of part two:
1.您将从主页开始。小部件看起来应该与第二部分末尾的小部件相同:
- Click on the Sprocket 9000 menu item to go to your product page. You should see a purple notification box instead of a link:
1.单击 Sprocket 9000 菜单项以转至产品页面。你应该看到一个紫色的通知框而不是一个链接:
- If you followed the Bonus Exercise section and created additional demo product pages you can also navigate to those and you will see the same view as the homepage:
1.如果您按照奖励练习部分创建了其他演示产品页面,您也可以导航到这些页面,您将看到与主页相同的视图:
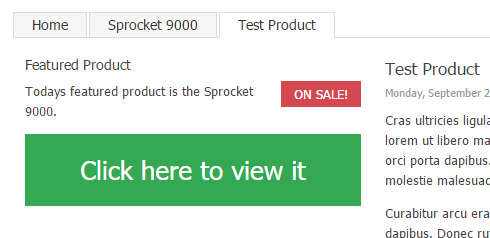
This is because it matches the content type but not the product id.
Download the code for this lesson
下载本课程的代码
You can download a copy of the module so far at this link:
您可以在此链接下载目前为止的模块副本:
-
Download Orchard.LearnOrchard.FeaturedProduct-Part3-v1.0.zip
-
[下载Orchard.LearnOrchard.FeaturedProduct-Part3-v1.0.zip](../附件/ getting-started-with-modules-part-3 / Orchard.LearnOrchard.FeaturedProduct-Part3-v1.0.zip) *
To use it in Orchard simply extract the archive into the modules directory at .\src\Orchard.Web\Modules\. If you already have the module installed from a previous part then delete that folder first.
要在Orchard中使用它,只需将存档解压缩到。\\ src \\ Orchard.Web \\ Modules \\的modules目录中。如果您已从上一部分安装了模块,则首先删除该文件夹。
For Orchard to recognize it the folder name should match the name of the module. Make sure that the folder name is
Orchard.LearnOrchard.FeaturedProductand then the modules files are located directly under that.要让Orchard识别它,文件夹名称应该与模块的名称相匹配。确保文件夹名称为“Orchard.LearnOrchard.FeaturedProduct”,然后模块文件直接位于其下。
Conclusion
结论
In this part we have learned valuable skills that will allow us to create content types in the admin dashboard and add fields to them. We have learned about dependency injection, how to request access to Orchard's various service classes, how to examine the current content item and make decisions based on it. Finally we looked at how we can create and surface custom information from the code of the module up to the view.
在这一部分中,我们学到了有价值的技能,使我们能够在管理仪表板中创建内容类型并为其添加字段。我们已经了解了依赖注入,如何请求访问Orchard的各种服务类,如何检查当前内容项以及基于它做出决策。最后,我们研究了如何从模块代码到视图创建和显示自定义信息。
In the next and final part of this getting started with modules course we will refine the existing module and apply some development best-practices that haven't been covered yet.
在接下来的[模块课程开始的最后一部分](模块入门 - 第4部分)中,我们将优化现有模块并应用一些尚未涵盖的开发最佳实践。