设置课程-Setting up for a lesson
Step 1 - Install Microsoft Visual Studio
第1步 - 安装Microsoft Visual Studio
If you don't have a it on your system then grab a copy of Microsoft Visual Studio Community 2015. Its totally free and it has most of the features of the full version and supports everything we will need to extend Orchard.
如果您的系统上没有它,请获取[Microsoft Visual Studio Community 2015]的副本(https://www.visualstudio.com/en-us/products/visual-studio-community-vs.aspx) 。它完全免费,它具有完整版的大部分功能,并支持我们扩展Orchard所需的一切。
Step 2 - Install Git Extensions
第2步 - 安装Git扩展
Every developer should have Git Extensions installed on their machine.
每个开发人员都应在其计算机上安装[Git Extensions](https://github.com/gitextensions/gitextensions/releases/latest)。
This is the easiest way to quickly clone the Orchard source code onto your dev machine. It's the easiest way to keep up to date when new code is released. As a bonus, if you haven't got to grips with Git and GitHub, this will gently introduce you to the whole process.
这是将Orchard源代码快速克隆到dev机器上的最简单方法。这是发布新代码时保持最新的最简单方法。作为奖励,如果你没有掌握Git和GitHub,这将会温和地向你介绍整个过程。
If you need detailed help installing Git Extensions and cloning the repository this process is described in the setting up a source enlistment tutorial in step-by-step detail.
如果您需要安装Git Extensions和克隆存储库的详细帮助,请按照[设置源登记](设置 - 源 - 登记)教程逐步详细说明此过程。
Step 3 - Set up a braces management extension
第3步 - 设置大括号管理扩展
This step is optional but recommended.
此步骤是可选的,但建议使用。
You will probably have noticed that Orchard code has the braces on the same line as the definition. It looks like this:
您可能已经注意到Orchard代码在与定义相同的行上具有大括号。它看起来像这样:
namespace Orchard.LearnOrchard.Example.Models {

    public class ExamplePart {

    }

}
Instead of what you normally see with .NET code where the opening curly brace is on its own line, which looks like this:
而不是你通常在.NET代码中看到的开放大括号在它自己的行上,而这看起来像这样:
namespace Orchard.LearnOrchard.Example.Models

{

    public class ExamplePart

    {

    }

}
The placement of the opening curly braces on the same line is a requirement listed in the code conventions document for Orchard CMS.
在同一行上打开花括号的位置是Orchard CMS的[代码约定](/ Documentation / Code-conventions)文档中列出的要求。
You can do it by editing the Visual Studio settings manually but this will apply it to all of your solutions whether they are Orchard-based or not.
您[可以通过手动编辑Visual Studio设置来实现](http://articles.runtings.co.uk/2015/09/orchard-cms-quick-tipcurling-up-with.html)但这将适用于所有解决方案,无论它们是否基于Orchard。
A better solution is to let a Visual Studio extension manage this for you. Orchard supports two options out of the box:
更好的解决方案是让Visual Studio扩展为您管理。 Orchard支持开箱即用的两个选项:
- ReSharper. (Paid) This is a powerful extension with many more features than simple brace management. It is recommended that you check this extension out if you haven't used it.
1. [ReSharper](https://visualstudiogallery.msdn.microsoft.com/ea4ac039-1b5c-4d11-804e-9bede2e63ecf)。 (付费)这是一个功能强大的扩展,除了简单的大括号管理之外还有许多其他功能。如果您没有使用它,建议您检查此扩展名。
- Rebracer. (Free) Orchard also supports the free Rebracer extension. This extension simply manages your brace configurations for you on a per-solution basis.
1. [Rebracer](https://visualstudiogallery.msdn.microsoft.com/410e9b9f-65f3-4495-b68e-15567e543c58)。 (免费)Orchard还支持免费的Rebracer扩展。此扩展程序可以在每个解决方案的基础上为您管理支撑配置。
Install one of these two extensions.
安装这两个扩展中的一个。
Step 4 - Clone the repository to your machine
第4步 - 将存储库克隆到您的计算机
You should always work on a fresh copy of Orchard when you're following a tutorial, testing out new 3rd party modules and themes from the Gallery, or working on your own modules to keep things clean.
当您关注教程,从[Gallery](http://gallery.orchardproject.net/)测试新的第三方模块和主题,或者在您自己的模块上工作时,您应该始终使用Orchard的新副本保持清洁。
Database tables are going to be modified, you will make changes in the admin dashboard, you will make mistakes and change things a second time. When you install new modules or themes they can inject their own data into your database and adjust built in content types. Even if you deactivate them again these changes can get left behind.
数据库表将被修改,您将在管理仪表板中进行更改,您将犯错误并再次更改内容。安装新模块或主题时,他们可以将自己的数据注入数据库并调整内置内容类型。即使您再次停用它们,这些更改也可能会被遗忘。
To stop this detritus getting into your main site you should always use a fresh copy to test things out in.
为了阻止这种碎屑进入你的主要网站,你应该总是使用一个新的副本来测试。
With Git Extensions and Orchard's support for SqlCE databases you can have a fresh copy of Orchard up and running in just a minute or two.
通过Git Extensions和Orchard对SqlCE数据库的支持,您可以在一两分钟内获得Orchard的全新副本。
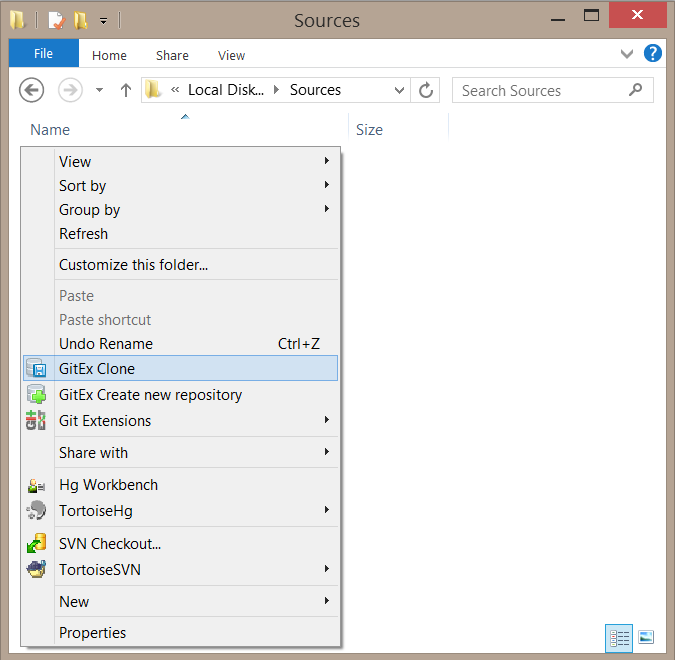
- In Windows Explorer, navigate to the local directory where you want your copy of the source code to live, right-click and choose
GitEx Clone.
1.在Windows资源管理器中,导航到您希望源代码副本存在的本地目录,右键单击并选择“GitEx Clone”。

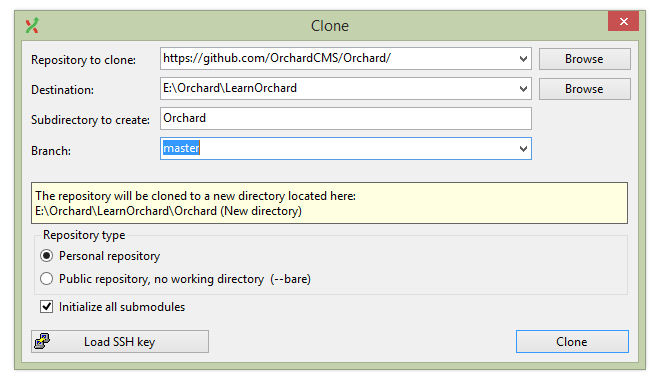
- In the clone window you have four fields to fill out:
2.在克隆窗口中,您需要填写四个字段:
* In the `Repository to clone` field type [https://github.com/OrchardCMS/Orchard/](https://github.com/OrchardCMS/Orchard/).

* The `Destination` field will already be filled out with your current directory.

* When you paste the repository URL it will also fill out the `Subdirectory to create` field. If you want to change this to a project name you can.

* Selecting the `Branch` dropdown will show you all of the current branches. This is loaded from GitHub so it may take a few seconds to load the list. Unless your lesson says differently, select `master` for the latest stable branch.
- The rest of the settings can be left as-is. Click
Clone.
3.其余设置可以保持原样。点击“克隆”。

Git Extensions will now pull down the files from the remote repository hosted on GitHub. This process will take a minute or two while the files are downloaded to your hard drive.
Git Extensions现在将从GitHub上托管的远程存储库中下载文件。将文件下载到硬盘驱动器时,此过程将花费一两分钟。
Tip: If you find yourself following this process often you can greatly speed this up by cloning from a local copy.
提示:如果您发现自己经常遵循此过程,则可以通过从本地副本克隆来大大提高速度。
To do this create a fresh clone on your hard drive and keep that as your reference copy. Then, instead of using a URL in the
Repository to clone:field you can point at the location of your reference copy stored on your local hard drive.为此,请在硬盘驱动器上创建一个新的克隆,并将其作为参考副本。然后,您可以指向存储在本地硬盘驱动器上的参考副本的位置,而不是使用
Repository to clone:字段中的URL。
The whole clone process should then take just a couple of seconds.
整个克隆过程应该只需几秒钟。
Step 5 - Complete the initial site setup process
第5步 - 完成初始站点设置过程
Now you just need to follow these last few steps to create a default database and set up the admin user:
现在,您只需按照以下最后几个步骤创建默认数据库并设置管理员用户:
- Open Visual Studio
1.打开Visual Studio
- Click
File,Open,Project/Solution...
1.单击“文件”,“打开”,“项目/解决方案......”
- Navigate to the folder you cloned the repo into
1.导航到您将repo克隆到的文件夹
- Open the main solution file located at
.\src\Orchard.sln
1.打开位于。\\ src \\ Orchard.sln的主解决方案文件
- Press
Ctrl-F5to start the project without debugging (it loads quicker)
1.按“Ctrl-F5”启动项目而不进行调试(加载速度更快)
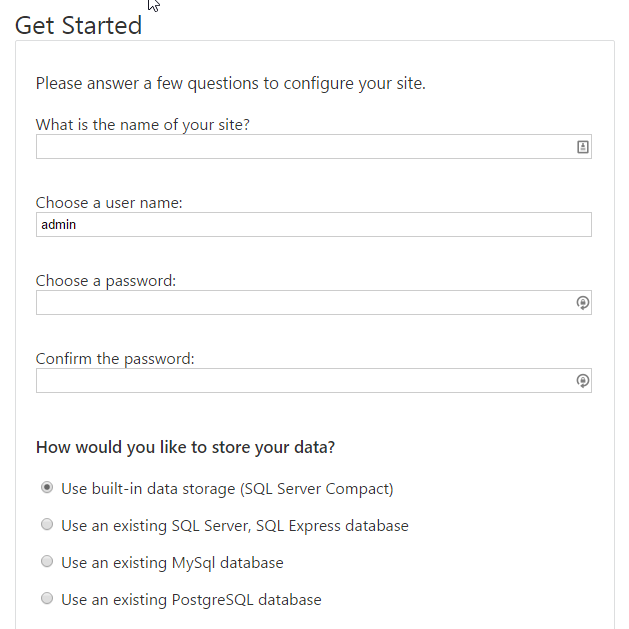
- You will now be presented with the
Get Startedinstall screen of Orchard:
1.现在,您将看到Orchard的“Get Started”安装屏幕:

Select these options:
- **Site name:** Enter any name you like that's related to the lesson you're following
- **User name:** admin
- **Password:** password
- **Data store:** SQL Server Compact
- **Recipe:** Default
- Click
Finish setup
1.单击“完成设置”
The site will now do its initial prep and present you with the Welcome to Orchard! start screen.
该网站现在将进行初步准备,并向您展示“欢迎来到Orchard!”开始屏幕。
Preparation completed
准备工作完成
You can now return to the lesson that brought you here.
您现在可以回到带您到这里的课程。