Forms (OrchardCore.Forms)
表格(OrchardCore.Forms)
The Forms module provides components in the form of widgets and workflow activities to create, validate and process forms.
Forms模块以窗口小部件和工作流活动的形式提供组件,以创建,验证和处理表单。
General Concepts
一般概念
When building a form, there are primarily two aspects involved:
构建表单时,主要涉及两个方面:
- Building the form.
1.构建表单。
- Processing the form when submitted.
2.提交表格时处理。
Both parts are independent from one another, so that you can just use the form builder and handle its submissions yourself, or provide the form HTML markup yourself but rely on workflows to handle form submission.
这两个部分彼此独立,因此您可以自己使用表单构建器并处理其提交,或者自己提供表单HTML标记,但依靠工作流来处理表单提交。
The form-building part relies on the Form widget. To create a form, add a Form widget to a zone or to a content item that has the FlowPart attached.
表单构建部分依赖于Form小部件。要创建表单,请将表单窗口小部件添加到区域或附加了FlowPart的内容项。
Creating a Form
创建表单
Creating a form typically involves the following steps:
创建表单通常包括以下步骤:
- Make sure the Forms feature is enabled.
1.确保已启用“表单”功能。
- Create a new content item that has the FlowPart attached. If you used the Blog recipe, there will be a Page content type that you can use.
2.创建附加了FlowPart的新内容项。如果您使用了Blog配方,则会有一个可以使用的页面内容类型。
- Add the Form widget.
3.添加表单小部件。
- Because the Form widget has the FlowPart attached, you can add other widgets to the Form widget. Add widgets such as Input, Textarea and Button to build up your form.
4.由于Form窗口小部件附加了FlowPart,因此您可以将其他窗口小部件添加到窗体小部件。添加诸如Input,Textarea和Button之类的小部件来构建表单。
Processing Form submissions
处理表格提交
Once you have a form in place, you need to handle its submission. The Form widget has a field called Action, into which you can enter a URL to where the form should submit to. This could be the path to your own controller, but it can also be the URL pointing to a workflow type.
一旦有表格,您需要处理其提交。表单窗口小部件有一个名为 Action 的字段,您可以在其中输入表单应提交到的URL。这可能是您自己的控制器的路径,但它也可以是指向工作流类型的URL。
Using a workflow is convenient because it doesn't require you to create a custom module.
使用工作流很方便,因为它不需要您创建自定义模块。
Creating a workflow and associating it with a form typically involves the following steps:
创建工作流并将其与表单相关联通常涉及以下步骤:
- Make sure the HTTP Workflows Activities feature is enabled.
1.确保已启用 HTTP工作流活动功能。
- Click on the Workflows menu item and create a new Workflow Type.
2.单击“工作流程”菜单项并创建新的“工作流程类型”。
- Add the Http Request Event event to the workflow. Make sure the HTTP Method field is set to POST.
3.将 Http Request Event 事件添加到工作流程中。确保 HTTP Method 字段设置为 POST 。
- Copy the generated workflow URL to your clipboard.
4.将生成的工作流URL复制到剪贴板。
- Click Save to save the changes and return to the workflow editor.
5.单击“保存”以保存更改并返回到工作流编辑器。
- Make sure the Http Request Event activity is configured as the start activity (on the workflow editor, single-click the activity and click on the on/off icon). The activity will have a green color if it's the starting activity.
5.确保将Http Request Event活动配置为启动活动(在工作流编辑器上,单击活动并单击开/关图标)。如果活动是起始活动,则活动将为绿色。
- Add any other activities to validate and process the form submission. We will see a real-world example later on.
5.添加任何其他活动以验证和处理表单提交。我们稍后会看到一个真实的例子。
- Click Save to save the workflow.
6.单击“保存”以保存工作流程。
- Go to the content item where you added a Form widget.
7.转到添加“表单”窗口小部件的内容项。
- Paste the workflow URL into the Action field.
8.将工作流URL粘贴到“操作”字段中。
- Save your content item.
9.保存您的内容项。
At this point, you should be able to test out your form and its submission.
此时,您应该能够测试您的表单及其提交。
Implementing a Contact Form
实施联系表格
In the following walkthrough, we'll build an actual contact form and implement a form handler using a workflow.
在下面的演练中,我们将构建一个实际的联系表单,并使用工作流实现表单处理程序。
The contact form will include the following fields:
联系表格将包括以下字段:
-
A Validation Summary widget.
-
验证摘要小部件。 *
-
A Name input widget.
-
名称输入小部件。 *
-
An Email input widget.
-
电子邮件输入小部件。 *
-
A Message text area widget.
-
消息文本区域小部件。 *
-
A Google NoCaptcha widget to protect against automated form submissions.
-
Google NoCaptcha小部件,可防止自动提交表单。 *
-
A Submit button widget.
-
提交按钮小部件。 *
The workflow will perform the following actions:
工作流程将执行以下操作:
-
Validate that the Name, Email and Message fields are not empty. If they are empty, we'll add Model State Validation errors.
-
验证名称,电子邮件和消息字段不为空。如果它们为空,我们将添加模型状态验证错误。 *
-
Validate the NoCaptcha.
-
验证NoCaptcha。 *
-
Send an email to the site owner that the contact form was submitted. The email will contain the submitted form fields.
-
向提交联系表单的网站所有者发送电子邮件。电子邮件将包含提交的表单字段。 *
Creating the Contact Form
创建联系表单
For this walkthrough, I am assuming you executed the Blog recipe when setting up the site, which will automatically create a Page content type with the FlowPart attached.
在本演练中,我假设您在设置站点时执行了博客配方,这将自动创建附加了FlowPart的页面内容类型。
when you have a fresh new installation, the first thing we need to do is enable the following features:
当你有一个全新的安装时,我们首先需要做的是启用以下功能:
-
Forms
-
形式 *
-
HTTP Workflow Activities
-
HTTP工作流活动 *
-
Email
-
电子邮件 *
Next, create a new Page content item and give it a title of Contact Form. Click the Add Widget button to add the Form widget.
接下来,创建一个新的页面内容项,并为其标题为 Contact Form 。单击添加窗口小部件按钮以添加窗体窗口小部件。
give the Form a title of Contact and leave the Action field empty for now.
给表单一个 Contact 标题,暂时将Action字段留空。
Add the following widgets to the Form widget:
将以下小部件添加到窗体小部件:
-
Validation Summary widget
-
验证摘要小部件 *
-
Input widget, Name = "Name", Type = "Text", Placeholder Text = "Enter your name"
-
输入小部件,名称=“名称”,类型=“文本”,占位符文本=“输入您的姓名” *
-
Input widget, Name = "Email", Type = "Email", Placeholder Text = "Enter your email address"
-
输入小部件,名称=“电子邮件”,类型=“电子邮件”,占位符文本=“输入您的电子邮件地址” *
-
Textarea widget, Name = "Message", Placeholder Text = "Enter your message"
-
Textarea小部件,Name =“Message”,占位符Text =“输入您的消息” *
-
NoCaptcha widget (we'll configure the settings momentarily)
-
NoCaptcha小部件(我们将暂时配置设置) *
-
Button widget, Text = "Submit!", Type = "Submit"
-
Button widget,Text =“Submit!”,Type =“Submit” *
Configuring NoCaptcha
配置NoCaptcha
When adding the NoCaptcha widget, a message was displayed that the NoCaptcha settings need to be configured before it will be displayed on the form. Let's do that right away.
添加NoCaptcha小部件时,会显示一条消息,说明在表单上显示之前需要配置NoCaptcha设置。让我们马上做。
Click on the NoCaptcha Settings link that is displayed within the message. Alternatively, go to Configuration -> Settings -> Forms.
单击消息中显示的 NoCaptcha Settings 链接。或者,转到配置 - > 设置 - > 表单。
The Forms settings shows two fields: SiteKey and Site Secret. You can get these values for free from https://developers.google.com/recaptcha/. The widget uses reCaptcha V2, so make sure to create Site Key and Site Secret for that version.
表单设置显示两个字段: SiteKey 和 Site Secret 。您可以从[https://developers.google.com/recaptcha/](https://developers.google.com/recaptcha/)免费获取这些值。小部件使用 reCaptcha V2 ,因此请确保为该版本创建站点密钥和站点密钥。
Once you have generated a Site Key and Site Secret with Google, copy & paste those values in the SiteKey and Site Secret fields, repsectively, and click the Save button.
使用Google生成站点密钥和站点密钥后,将这些值复制并粘贴到SiteKey和Site Secret字段中,然后单击“保存”按钮。
The final form configuration should look something like this:
最终的表单配置应如下所示:

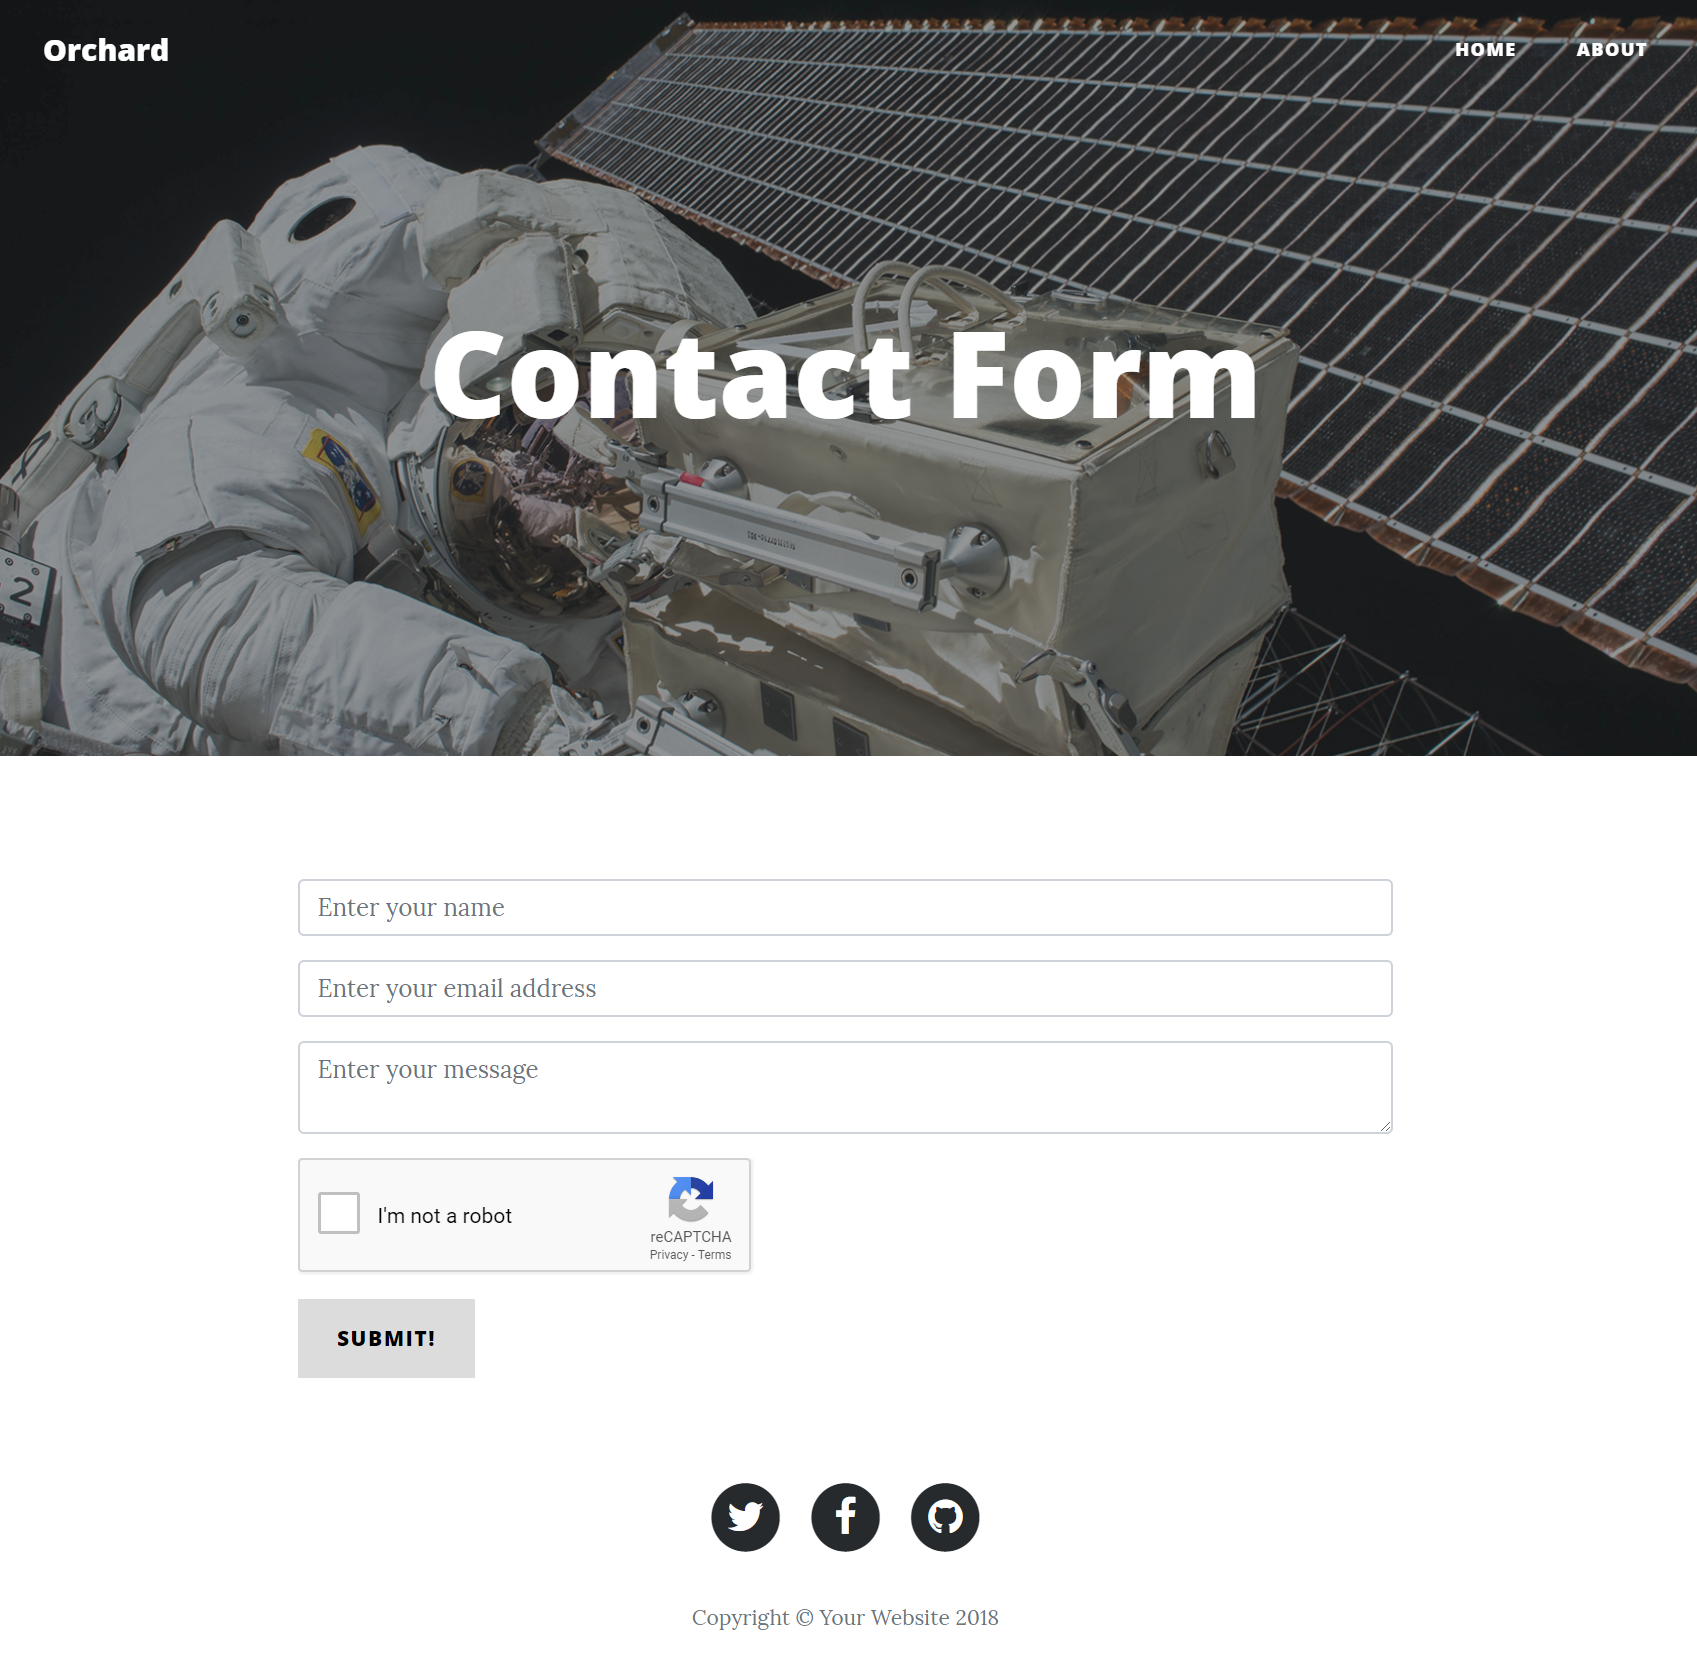
And on the front-end, it will look like this:
在前端,它看起来像这样:
Create the Contact Form Workflow
创建联系表单工作流程
In order to validate the form input and send an email, we will create a workflow.
为了验证表单输入并发送电子邮件,我们将创建一个工作流程。
From the admin menu, click the Workflows menu item. Next, click on Create Workflow Type.
从管理菜单中,单击工作流程菜单项。接下来,单击创建工作流程类型。
We're now asked to provide a name for the workflow. Enter "Contact Form Workflow", leave the other options as-is, and click Save. When you do, you will be redirected to the Workflow Editor, which is where we'll implement the Contact Form submission logic.
我们现在要求提供工作流程的名称。输入“联系表单工作流程”,保留其他选项,然后单击“保存”。当您这样做时,您将被重定向到工作流程编辑器,这是我们将实现联系表单提交逻辑的地方。
Adding the Http Request Event
添加Http请求事件
Click on the Add Event button and look for the activity named HTTP Request.
单击Add Event按钮,查找名为 HTTP Request 的活动。
For the Title, enter "Contact Form Submitted", and change the HTTP Method selection to POST.
对于标题,输入“提交的联系表单”,并将 HTTP方法选项更改为 POST 。
Copy the generated URL (without the scheme, host name and port number) to the clipboard, because we will need it to update the form we created.
将生成的URL(没有方案,主机名和端口号)复制到剪贴板,因为我们需要它来更新我们创建的表单。
Click Save to return to the workflow editor.
单击“保存”返回工作流编辑器。
Back on the workflow editor, we have now a single activity. Single-click this activity and click on the left-most icon to turn this activity into the starting activity.
回到工作流编辑器,我们现在有一个活动。单击此活动,然后单击最左侧的图标将此活动转换为启动活动。
Adding the Fork Activity
添加Fork活动
There are various aspects of the form that we need to validate: we want to make sure the user entered a value for the Name, Email and Message fields, and we want to make sure the captcha is valid.
我们需要验证表单的各个方面:我们要确保用户输入 Name , Email 和 Message 字段的值,我们希望确保验证码有效。
Although we could perform each field validation sequentially (i.e. one at a time), we are going to do it in parallel. The advantage of doing so is that we can perform form field validation without having to check the result of each validation immediately. Instead, we can simply check the ModelState.IsValid property after all form fields have been validated. This keeps the workflow simplified, and works similar to when you would perform this validation from code.
虽然我们可以顺序执行每个字段验证(即一次一个),但我们将并行执行。这样做的好处是我们可以执行表单字段验证,而无需立即检查每个验证的结果。相反,我们可以在验证所有表单字段后检查ModelState.IsValid属性。这使工作流程简化,并且与从代码执行此验证时的工作方式类似。
To execute branches of execution in parallel, we need to add the Fork activity, so go ahead and click the Add Task button and look for the Fork activity.
要并行执行执行分支,我们需要添加 Fork 活动,因此请继续并单击Add Task按钮并查找Fork活动。
In the Fork activity editor, enter "Validate Form Fields" as the Title, and enter the following outcomes: "Validate Name, Validate Email, Validate Message, Validate Captcha".
在Fork活动编辑器中,输入“验证表单字段”作为标题,并输入以下结果:`“验证名称,验证电子邮件,验证消息,验证验证码”。
Click on Save to save the changes and to be returned to the workflow editor.
单击“保存”以保存更改并返回到工作流编辑器。
Connect the Http Request activity to the Fork activity you just added.
将 Http Request 活动连接到刚刚添加的 Fork 活动。
Adding Name, Email and Message Validation
添加名称,电子邮件和消息验证
Next, we will do the following for each of Name, Email and Message:
接下来,我们将针对名称,电子邮件和消息执行以下操作:
Add the Validate Form Field activity. Enter a title of "Validate Name" for the Name field, "Validate Email" for the Email field and "Validate Message" for the Message field.
添加验证表单字段活动。为名称字段输入“验证名称”的标题,为电子邮件字段输入“验证电子邮件”,为“消息”字段输入“验证消息”。
Enter the appropriate field name for the Field Name field ("Name", "Email" and "Message", respectively).
为字段名称字段输入相应的字段名称(分别为“名称”,“电子邮件”和“消息”)。
In the Error Message field, enter "<field name here> is required".
在错误消息字段中,输入“”
The Validate Form Field activity in the Beta 2 version of the Forms module only supports checking if the form field is empty or not. The RC version will have support for other kinds of validation, including the ability to provide custom vlidation.
Beta模型的Forms模块中的 Validate Form Field 活动仅支持检查表单字段是否为空。 RC版本将支持其他类型的验证,包括提供自定义vlidation的功能。
Adding NoCaptcha
添加NoCaptcha
To add the NoCaptcha validation activity, click Add Task and find the Validate NoCaptcha. Since there is nothing to configure on this activity, you'll be redirected straight to the workflow editor when you click Add.
要添加NoCaptcha验证活动,请单击“添加任务”,然后找到验证NoCaptcha 。由于此活动无需配置任何内容,因此单击“添加”时,您将直接重定向到工作流编辑器。
Once you added all 4 validation tasks, connect the Fork activity to the validation activities using the appropriate outcomes. For example, connect the "Validate Name" outcome of the Fork activity to the "Validate Name" activity.
添加完所有4个验证任务后,使用适当的结果将Fork活动连接到验证活动。例如,将Fork活动的“Validate Name”结果连接到“Validate Name”活动。
If the specified form field is empty, the Validate Form Field activity will add a model validation error to the ModelState dictionary. The same goes for the Validate NoCaptcha activity if the captcha failed. This is useful, because we now only have to add a single check to see if there are any model validation errors.
如果指定的表单字段为空,则 Validate Form Field 活动将模型验证错误添加到ModelState 字典。如果验证码失败, Validate NoCaptcha 活动也是如此。这很有用,因为我们现在只需要添加一个检查以查看是否存在 any 模型验证错误。
Before we do that however, we first need to join the forked workflow execution back into a single flow.
然而,在我们这样做之前,我们首先需要将分叉的工作流执行加入到单个流中。
Adding the Join Activity
添加加入活动
The Join activity will merge the forked workflow back into a single flow of execution. There are two modes: Wait Any and Wait All. In our case, we need the Wait All mode, because we need all validation steps to finish before continuing.
Join 活动将分叉的工作流程合并为单个执行流程。有两种模式:等待任何和等待所有。在我们的例子中,我们需要 Wait All 模式,因为我们需要在继续之前完成所有验证步骤。
Go ahead and add the Join activity to the workflow, and make sure to connect the Done outcome of each validation task to the Join activity. The "Done" outcome will execute regardless of whether or not the form field validation step failed or not, which is exactly what we want.
继续将Join活动添加到工作流程中,并确保将每个验证任务*的 Done 结果连接到Join活动。无论表单字段验证步骤是否失败,“完成”结果都将执行,这正是我们想要的。
Adding the Validate Form Activity
添加验证表单活动
The Validate Form activity will check if the ModelState is valid or not. If any validation errors occurred, it will return False, and True otherwise.
Validate Form 活动将检查ModelState是否有效。如果发生任何验证错误,则返回False,否则返回True。
Go ahead and add the Validate Form activity and connect it to the Join activity.
继续并添加Validate Form活动并将其连接到Join活动。
Next, we have to implement the two possible outcomes: Valid and Invalid.
接下来,我们必须实现两种可能的结果:有效和无效。
If the outcome is Invalid, we will redirect back to the form. Since the form contains a Validation Summary, it will display all validation errors.
如果结果为无效,我们将重定向回表单。由于表单包含验证摘要,因此它将显示所有验证错误。
If the outcome is Valid, we want to send an email and redirect the user to a Thank You page.
如果结果是有效的,我们希望发送电子邮件并将用户重定向到“感谢您”页面。
Let's implement the Redirect first.
让我们先实现重定向。
Adding the First Redirect Activity
添加第一个重定向活动
Click the Add Task button and locate the Redirect activity. Use "Display Form Errors" for the title, and enter the relative path to the Contact Form content item (/contact-form if you used the same title as I did).
单击“添加任务”按钮,然后找到“重定向”活动。使用“显示表单错误”作为标题,并输入联系表单内容项的相对路径(如果您使用与我相同的标题,则输入/ contact-form)。
Click Save and connect the Invalid outcome of the Validate Form activity to the Redirect activity you just added.
单击“保存”,将“验证表单”活动的“无效结果”连接到刚刚添加的“重定向”活动。
Adding the Email Activity
添加电子邮件活动
Click the Add Task button and locate the Send Email activity. Enter the following values:
单击“添加任务”按钮,找到“发送电子邮件”活动。输入以下值:
-
Title:
Send Email to Site Admin -
标题:`向网站管理员发送电子邮件' *
-
Sender: (leave empty)
-
发件人:(留空) *
-
Recipients:
admin@orchardcore.io -
收件人:
admin @ orchardcore.io* -
Subject:
Contact Form submitted by {{ Request.Form.Name }}! -
主题:
{{Request.Form.Name}}提交的联系表格!* -
Body:
-
身体: *
<p>The following information was submitted:<p/>

 <font color=#0099ff size=4 face="黑体"><p>提交了以下信息:<p /></font>


<p>Name: {{ Request.Form.Name }}</p>

 <font color=#0099ff size=4 face="黑体"><p>姓名:{{Request.Form.Name}} </ p></font>


<p>Email: {{ Request.Form.Email }}</p>

 <font color=#0099ff size=4 face="黑体"><p>电子邮件:{{Request.Form.Email}} </ p></font>


<p>Message: {{ Request.Form.Message }}</p>

 <font color=#0099ff size=4 face="黑体"><p>消息:{{Request.Form.Message}} </ p></font>
Configuring SMTP
配置SMTP
In order to try out sending emails, you will need to configure the SMTP settings. You can do so via Configuration -> Settings -> Smtp. For development purposes, I am a big fan of Smtp4Dev, which makes it super easy to try out sending emails without actually sending them. It's basically an SMTP host that intercepts emails being sent that you can then inspect.
要尝试发送电子邮件,您需要配置SMTP设置。您可以通过 Configuration * - > * Settings * - > * Smtp 来实现。出于开发目的,我是[Smtp4Dev](https://github.com/rnwood/smtp4dev)的忠实粉丝,这使得尝试发送电子邮件非常容易,而无需实际发送。它基本上是一个SMTP主机拦截发送的电子邮件,然后您可以检查。
When configuring the SMTP settings in Orchard, make sure to provide the Sender email address, which will be used by default (remember, we didn't specify a Sender in the Send Email activity). Enter system@orchardcore.io or any other valid email address you like.
在Orchard中配置SMTP设置时,请确保提供发件人电子邮件地址,默认情况下将使用该邮件地址**(请记住,我们未在“发送电子邮件”活动中指定发件人)。输入system @ orchardcore.io或您喜欢的任何其他有效电子邮件地址。
If you're using Smtp4Dev, make sure to enter localhost in the Host name field, and the configured port number.
如果您使用的是Smtp4Dev,请确保在主机名字段中输入localhost和配置的端口号。
Adding the Second Redirect Activity
添加第二个重定向活动
After the email is sent, we want to redirect the user to a "Thank You" page. Go ahead and add a Redirect activity, using Display Thank You Page as the title and /thank-you as the URL. Make sure to connect the Done outcome of the Send Email activity to this new Redirect activity.
发送电子邮件后,我们希望将用户重定向到“谢谢”页面。继续添加一个Redirect活动,使用Display Thank You Page作为标题,使用/ thank-you作为URL。确保将“发送电子邮件”活动的完成结果连接到此新的重定向活动。
Adding a Thank You Page
添加一个感谢页面
Create a new Page content item with a title of Thank You!, and make sure its Permalink is thank-you after saving. Add any widgets to this page that you like. For example, add the Paragraph widget with the following text: Thank you for reaching out! We'll get back to you soon.
创建一个标题为“谢谢!”的新页面内容项,并在保存后确保其永久链接为“谢谢”。将任何小部件添加到您喜欢的页面。例如,使用以下文本添加 Paragraph 小部件:`谢谢你伸出援手!我们很快就会回复你
Updating the Contact Form widget
更新“联系表单”小组件
Now that our workflow is done, we need to update the Contact Form widget with the Workflow URL that was generated for us in the Http Request activity. Unless you have that URL still on your clipboard, go back to the first activity on the workflow, double-click it to get to its activity editor, and copy the URL (without the scheme, host and port number; just the path).
现在我们的工作流程已经完成,我们需要使用在 Http Request 活动中为我们生成的工作流URL更新Contact Form小部件。除非您的剪贴板上仍有该URL,否则请返回工作流上的第一个活动,双击它以进入其活动编辑器,然后复制URL(不包括方案,主机和端口号;只有路径)。
Go back to the Contact Form page content item, expand the Contact Form widget and paste in the URL into the Action field and save your changes.
返回“联系表单”页面内容项,展开“联系表单”窗口小部件并将URL粘贴到操作字段中并保存更改。
Try it out!
试试看!
Go ahead and try it out. Navigate to https://localhost:44300/contact-form and fill out the form. If all went well, you should see an email coming in and be redirected to the Thank You page.
继续尝试一下。导航到https:// localhost:44300 / contact-form并填写表单。如果一切顺利,您应该会看到一封电子邮件,并被重定向到Thank You页面。
If you leave any field empty or do not pass the captcha, you should be redirected to the Contact Form page and see the validation errors.
如果您将任何字段留空或未通过验证码,则应将您重定向到“联系表单”页面并查看验证错误。
Fixing the Lost Field Values Isue
修复丢失的字段值Isue
There's one issue with the form that I left out intentionally to the very last. To see the problem, try entering some values in the form, except for one (e.g. leave Email empty, or do not check the captcha checkbox). When you submit the form, notice that the values you entered have disappeared.
这个表格有一个问题,我故意排到最后。要查看问题,请尝试在表单中输入一些值(一个除外)(例如,将电子邮件留空,或者不检查验证码复选框)。提交表单时,请注意您输入的值已消失。
Normally what happens when you submit a form to an MVC controller, the model binder will bind the fields to some view model. During the model binding phase, MVC will add model state entries. However, we are not invoking model binding anywhere. We only add model validation errors when we identify a missing value.
通常,当您将表单提交给MVC控制器时会发生什么,模型绑定器会将字段绑定到某个视图模型。在模型绑定阶段,MVC将添加模型状态条目。但是,我们不会在任何地方调用模型绑定。我们只在识别缺失值时添加模型验证错误。
To fix this, we must add the Bind Form Model State activity to the workflow, and connect it in between the first activity (Http Request) and the second activity (the Fork activity). This will cause all Form fields to be copied into ModelState, which is used when displaying the form again.
要解决这个问题,我们必须将 Bind Form Model State 活动添加到工作流程中,并将其连接到第一个活动(Http Request)和第二个活动(Fork活动)之间。这将导致所有表单字段都复制到ModelState中,这在再次显示表单时使用。
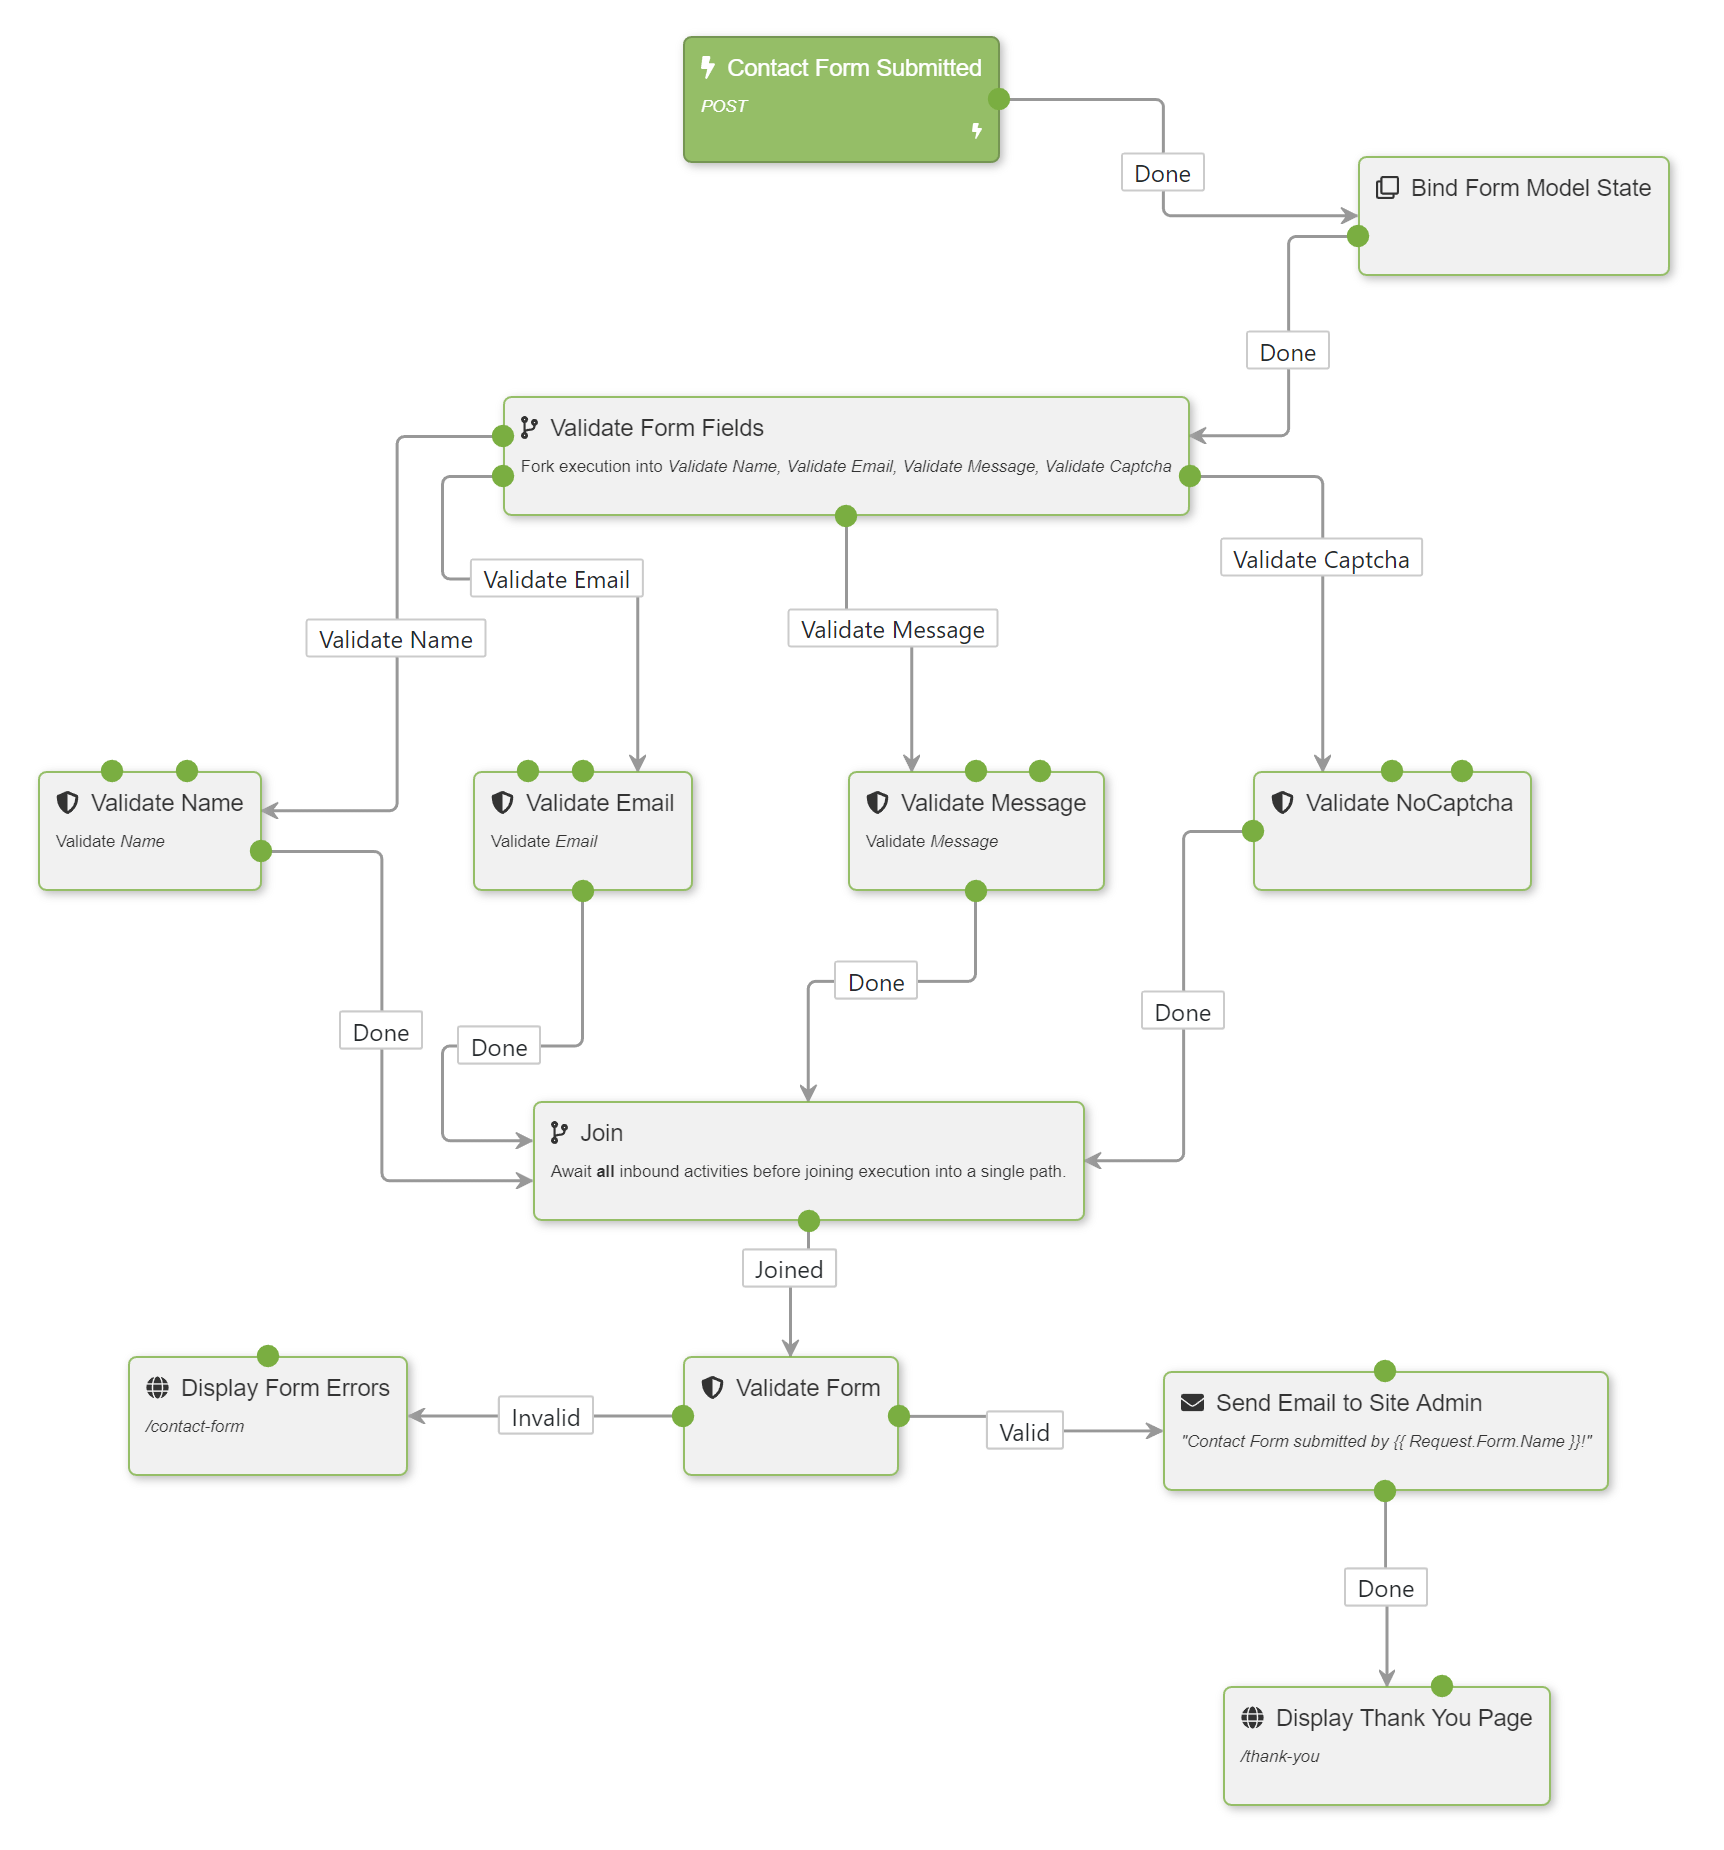
The final workflow should look like this:
最终的工作流程应如下所示:
Future Improvements
未来的改进
Implementing a workflow that handles form submissions is easy, but the workflow becomes big quite quickly as soon as you start adding validation logic to the mix. In the next version of the Forms module, there will be an easier way to validate Form submissions in combination with the Form widget. The Form widget will contain all of the validation settings, and there will be a single workflow activity that validates the submitted values against those settings.
实现处理表单提交的工作流很容易,但只要您开始在混合中添加验证逻辑,工作流就会很快变大。在Forms模块的下一个版本中,将有一种更简单的方法来结合Form小部件验证Form提交。表单窗口小部件将包含所有验证设置,并且将有一个工作流活动根据这些设置验证提交的值。
The low-level validation activities will remain part of the toolbox to support workflow validation for forms that are not built with the Form widget, but implemented as raw HTML for example.
低级验证活动将仍然是工具箱的一部分,以支持不是使用表单窗口小部件构建的表单的工作流验证,而是实现为原始HTML。