This article describes how to build a very small module for Orchard that will just display a "hello world" page. The technique that it shows you is a great start if you are looking to take control of the page lifecycle with your own MVC controller.
本文介绍如何为Orchard构建一个非常小的模块,它只显示一个“hello world”页面。如果您希望使用自己的MVC控制器控制页面生命周期,那么它向您展示的技术是一个很好的开始。
Another simple example of a module can be found here: Quick Start - Get module blueprint
可以在此处找到模块的另一个简单示例:[快速入门 - 获取模块蓝图](http://orchardjumpstart.codeplex.com/)
This guide has been marked for review. If you are just getting started with Orchard module development you should read the Getting Started with Modules course first. It will introduce you to building modules with Orchard using Visual Studio Community, a free edition of Visual Studio.
本指南已标记为可供审阅。如果您刚开始使用Orchard模块开发,则应首先阅读[模块入门课程](模块入门)。它将向您介绍使用Visual Studio社区构建模块,Visual Studio社区是Visual Studio的免费版本。
Introduction
介绍
Orchard is built on top of ASP.NET MVC, which means that if you already know that framework you should feel right at home. If not, do not worry as we'll explain everything we're doing.
Orchard构建于ASP.NET MVC之上,这意味着如果您已经知道该框架,您应该感到宾至如归。如果没有,请不要担心,因为我们将解释我们正在做的一切。
MVC is a pattern where concerns are neatly separated: there is a model (M) for the data, a controller (C) that orchestrates the UI and determines how it operates on the model, and a view (V) whose only responsibility is to display what the controller hands it.
MVC是一种模式,其中关注点被巧妙地分开:数据的模型(M),编排UI的控制器(C)和确定它如何在模型上运行,以及视图(V),其唯一的责任是显示控制器提供的内容。
In the case of our Hello World module, we won't have any data so the model will be of no concern to us. We will just have a controller and a view. All the rest will be some necessary plumbing to declare what we're doing to Orchard. We will come back to these concepts and recapitulate once we've built our module.
对于我们的Hello World模块,我们将不会有任何数据,因此我们无需关注该模型。我们将只有一个控制器和一个视图。剩下的将是一些必要的管道,以宣布我们正在对乌节做些什么。一旦我们构建了模块,我们将回到这些概念并重新概括。
Modules in Orchard are sets of extensions that can be packaged in order to be re-used on other Orchard sites. Modules are implemented as MVC Areas. Areas in MVC are sub-sites that contain a set of features that act in relative isolation from the other parts of the site. An Orchard module is simply an area with a manifest file. It may use Orchard APIs (but it doesn't necessarily have to).
Orchard中的模块是一组扩展,可以打包以便在其他Orchard站点上重复使用。模块实现为MVC区域。 MVC中的区域是包含一组功能的子站点,这些功能与站点的其他部分相对隔离。 Orchard模块只是一个带有清单文件的区域。它可能使用Orchard API(但不一定非必须)。
Generating the Module Structure
生成模块结构
Before you can generate the file structure for your module, you need to download, install, and enable the Code Generation feature for Orchard. For more information, see Command-line Code Generation.
在为模块生成文件结构之前,需要为Orchard下载,安装和启用代码生成功能。有关更多信息,请参阅[命令行代码生成](命令行脚手架)。
Once you have code generation enabled, open the Orchard command-line, and create the HelloWorld module with the following command:
启用代码生成后,打开Orchard命令行,使用以下命令创建“HelloWorld”模块:
codegen module HelloWorld
Modifying the Manifest
修改清单
You should now have a new HelloWorld folder under the Modules folder of your Orchard web site. In this folder, you'll find a Module.txt file. Open it and customize it as follows:
您现在应该在Orchard网站的Modules文件夹下有一个新的HelloWorld文件夹。在此文件夹中,您将找到Module.txt文件。打开它并按如下方式自定义:
name: HelloWorld

antiforgery: enabled

author: The Orchard Team

website: http://orchardproject.net

version: 0.5.0

orchardversion: 1.8.1

description: The Hello World module is greeting the world and not doing much more.

features:

    HelloWorld:

        Description: A very simple module.

        Category: Sample
This text file is describing your module to the system. The information contained in this file will be used for example in the features administration screen.
此文本文件正在向系统描述您的模块。此文件中包含的信息将用于功能管理屏幕中。
Note
!注意
While both spaces and tabs are supported to indent the manifest file, we recommend that you use spaces instead of tabs.

As with your main coding, using spaces gives a more consistent editing experience when working in teams.
Adding the Route
添加路线
Your module will have to handle the /HelloWorld relative URL under your Orchard web site. In order to declare what to do when that URL gets hit, create the following Routes.cs file in the HelloWorld folder:
您的模块必须处理Orchard网站下的/ HelloWorld相对URL。要在该URL被命中时声明要执行的操作,请在HelloWorld文件夹中创建以下Routes.cs文件:
using System.Collections.Generic;

using System.Web.Mvc;

using System.Web.Routing;

using Orchard.Mvc.Routes;


namespace HelloWorld {

    public class Routes : IRouteProvider {

        public void GetRoutes(ICollection<RouteDescriptor> routes) {

            foreach (var routeDescriptor in GetRoutes())

                routes.Add(routeDescriptor);

        }


        public IEnumerable<RouteDescriptor> GetRoutes() {

            return new[] {

                new RouteDescriptor {

                    Priority = 5,

                    Route = new Route(

                        "HelloWorld", // this is the name of the page url

                        new RouteValueDictionary {

                            {"area", "HelloWorld"}, // this is the name of your module

                            {"controller", "Home"},

                            {"action", "Index"}

                        },

                        new RouteValueDictionary(),

                        new RouteValueDictionary {

                            {"area", "HelloWorld"} // this is the name of your module

                        },

                        new MvcRouteHandler())

                }

            };

        }

    }

}
A route is a description of the mapping between URLs and controller actions. This code maps the HelloWorld URL to the area HelloWorld with the Home controller and the Index action.
路由是URL和控制器操作之间映射的描述。此代码使用Home控制器和Index操作将HelloWorld URL映射到HelloWorld区域。
Creating the Controller
创建控制器
The new module also has a Controllers folder ready to be filled. Create the following HomeController.cs file in that folder:
新模块还有一个可以填充的Controllers文件夹。在该文件夹中创建以下HomeController.cs文件:
using System.Web.Mvc;

using Orchard.Themes;


namespace HelloWorld.Controllers {

    [Themed]

    public class HomeController : Controller {

        public ActionResult Index() {

            return View("HelloWorld");

        }

    }

}
This is the controller that will handle the requests for the HelloWorld URL. The default action, index, is requesting that the HelloWorld view gets rendered.
这是将处理HelloWorld URL请求的控制器。默认操作index是请求呈现HelloWorld视图。
Notice the Themed attribute on the controller class that will request that the view gets skinned with the currently active theme.
请注意控制器类上的Themed属性,该属性将请求使用当前活动主题为视图设置外观。
Creating the View
创建视图
In the Views folder, create a folder named Home. In the Views\Home folder, create the following HelloWorld.cshtml file:
在Views文件夹中,创建名为Home的文件夹。在Views \ Home文件夹中,创建以下HelloWorld.cshtml文件:
<h2>@T("Hello World!")</h2>
This file is specifying the core contents of our view. All the chrome around it will get added by the current theme's default layout.
此文件指定了视图的核心内容。它周围的所有镶边都将被当前主题的默认布局添加。
Notice that we used the T helper function that makes this view ready to be localized. This is not mandatory but it's a nice touch.
请注意,我们使用了T帮助函数,使该视图可以进行本地化。这不是强制性的,但它是一个很好的接触。
Adding the new files to the project
将新文件添加到项目中
We're almost done. The only task remaining is to declare to the system the set of files in the module for dynamic compilation.
我们差不多完成了。剩下的唯一任务是向系统声明模块中用于动态编译的文件集。
Open the HelloWorld.csproj file in a text editor and add the following lines after one of the </ItemGroup> tags:
在文本编辑器中打开HelloWorld.csproj文件,并在其中一个&lt; / ItemGroup&gt;之后添加以下行。标签:
<ItemGroup>

  <Compile Include="Routes.cs"/>

  <Compile Include="Controllers\HomeController.cs"/>

</ItemGroup>
Also add the following to the ItemGroup section that already has other Content tags:
还要将以下内容添加到已包含其他Content标记的ItemGroup部分:
<Content Include="Views\Home\HelloWorld.cshtml" />
Activate the Module
激活模块
Finally, you need to activate your new module. In the command line, type:
最后,您需要激活新模块。在命令行中,键入:
feature enable HelloWorld
You could also have done this from the "Features" screen in the site's admin UI.
您也可以通过站点管理UI中的“功能”屏幕完成此操作。
Use the Module
使用模块
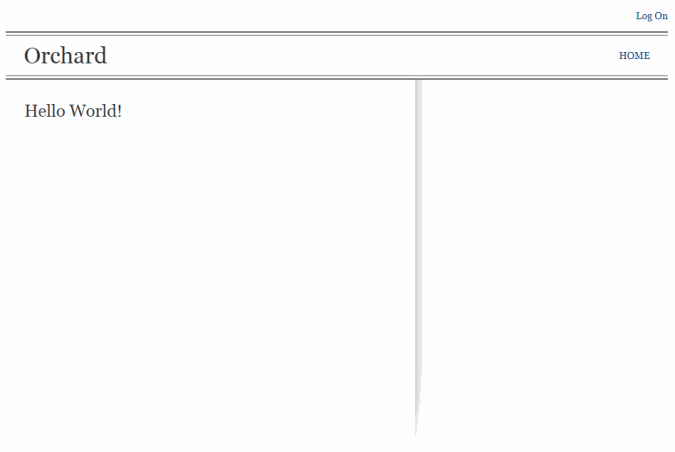
You may now add /HelloWorld to the URL of your Orchard site in your favorite web browser and obtain a nice Hello World message:
您现在可以在您喜欢的Web浏览器中将/ HelloWorld添加到Orchard站点的URL并获取一个很好的Hello World消息:
Conclusion
结论
In this tutorial, we have built a very simple module that handles a route (/HelloWorld) through the home controller's index action and serves a simple view that gets skinned by the current theme. We have done so with only free tools and in a way that differs very little from what you would do in a regular ASP.NET MVC area. We did get a few things for free by making this an Orchard module, such as activation/deactivation of the module, or theming of the view with no effort on our part.
在本教程中,我们构建了一个非常简单的模块,通过主控制器的索引操作处理路径(/ HelloWorld),并提供一个由当前主题进行换肤的简单视图。我们只使用免费工具,并且与您在常规ASP.NET MVC区域中所做的工作差别很小。我们确实通过将其作为Orchard模块免费获得了一些东西,例如模块的激活/停用,或者我们不费力地查看视图。
Hopefully this will get you started with Orchard and prepare you to build more elaborate modules.
希望这将使您开始使用Orchard并准备构建更复杂的模块。
The code for this topic can be downloaded from here: HelloWorld.zip
可以从这里下载该主题的代码:[HelloWorld.zip](../ Attachments / Building-a-hello-world-module / HelloWorld.zip)