编写Orchard模块-Writing an Orchard Module
This topic is obsolete. If you are just getting started with Orchard module development you should read the Getting Started with Modules course first. It will introduce you to building modules with Orchard using Visual Studio Community, a free edition of Visual Studio.
本主题已过时。如果您刚开始使用Orchard模块开发,则应首先阅读[模块入门课程](模块入门)。它将向您介绍使用Visual Studio社区构建模块,Visual Studio社区是Visual Studio的免费版本。
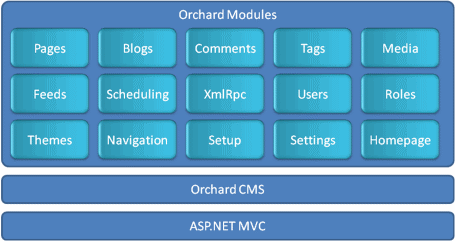
Orchard is designed with modular extensibility in mind. The current application contains a number of built-in modules by default, and our intent with writing these modules has been to validate the underlying CMS core as it is being developed - exploring such concepts as routable content items, their associated "parts" (eventually to be bolted on using metadata), UI composability of views from separate modules, and so on. While there are many CMS core concepts that remain unimplemented for now, there are still many things you can do with the current system. The module concept is rooted in ASP.NET MVC Areas (1,2) with the idea that module developers can opt-in to Orchard-specific functionality as needed. You can develop modules in-situ with the application as "Areas", using Visual Studio's MVC tools: Add Area, Add Controller, Add View, and so on (in VS2010). You can also develop modules as separate projects, to be packaged and shared with other users of Orchard CMS (the packaging story is still to be defined, along with marketplaces for sharing modules). This is how the Orchard source tree is currently organized. There is also a "release" build of Orchard that contains all the modules pre-built and ready to run (without source code), that you can extend using the VS tooling for MVC Areas - this can be downloaded from
Orchard的设计考虑了模块化的可扩展性。当前应用程序默认包含许多内置模块,我们编写这些模块的目的是在开发时验证底层CMS核心 - 探索可路由内容项及其相关“部分”等概念(最终使用元数据来固定,来自不同模块的视图的UI可组合性等等。虽然目前仍有许多CMS核心概念尚未实现,但您仍可以使用当前系统做很多事情。模块概念植根于ASP.NET MVC领域([1](http://weblogs.asp.net/scottgu/archive/2009/07/31/asp-net-mvc-v2-preview-1-released。 aspx),[2](http://haacked.com/archive/2009/07/31/single-project-areas.aspx))认为模块开发人员可以根据需要选择加入Orchard特定的功能。您可以使用Visual Studio的MVC工具将应用程序作为“区域”原位开发模块:添加区域,添加控制器,添加视图等(在VS2010中)。您还可以将模块开发为单独的项目,与Orchard CMS的其他用户打包和共享(包装故事仍有待定义,以及共享模块的市场)。这就是Orchard源树目前的组织方式。还有一个Orchard的“发布”版本,其中包含预先构建并准备运行的所有模块(没有源代码),您可以使用VS工具扩展MVC区域 - 这可以从
http://orchard.codeplex.com/releases.
[http://orchard.codeplex.com/releases](http://orchard.codeplex.com/releases)。
Let's take a walk through building an Orchard module as an MVC Area in VS. We'll start simple (Hello World), and gradually build up some interesting functionality using Orchard.
让我们一起来构建一个Orchard模块作为VS中的MVC区域。我们将开始简单(Hello World),并逐渐使用Orchard构建一些有趣的功能。
Installing Software Prerequisites
安装软件先决条件
First, install these MVC and Orchard releases to your machine, along with Visual Studio or Visual Web Developer for code editing:
首先,将这些MVC和Orchard版本与Visual Studio或Visual Web Developer一起安装到您的机器上进行代码编辑:
- Install VS2010 (Express or higher)
1.安装VS2010(Express或更高版本)
- Download and Install ASP.NET MVC 3
2.下载并安装ASP.NET MVC 3
- Download and extract the latest "release" build from http://orchard.codeplex.com
3.从http://orchard.codeplex.com下载并提取最新的“发布”版本
- Double-click the csproj file in the release package to open it in VS
4.双击发行包中的csproj文件,在VS中打开它
Getting Started: A Simple Hello World Module ("Area" in VS)
入门:简单的Hello World模块(VS中的“区域”)
Our objective in this section is to build a very simple module that displays "Hello World" on the front-end using the applied Orchard theme. We'll also wire up the navigation menu to our module's routes.
我们在本节中的目标是构建一个非常简单的模块,使用应用的Orchard主题在前端显示“Hello World”。我们还将导航菜单连接到我们模块的路线。
Objectives:
目标:
-
A simple custom area that renders "Hello World" on the app's front-end
-
一个简单的自定义区域,在应用程序的前端呈现“Hello World” *
-
Views in the custom area that take advantage of the currently applied Orchard theme
-
自定义区域中的视图利用当前应用的Orchard主题 *
-
A menu item on the front-end for navigating to the custom area's view
-
前端的菜单项,用于导航到自定义区域的视图 *
Follow These Steps:
跟着这些步骤:
- Right-click the project node in VS Solution Explorer, and choose "Add > Area..."
1.在VS Solution Explorer中右键单击项目节点,然后选择“添加>区域...”
- Type "Commerce" for the area name and click OK.
2.为区域名称键入“Commerce”,然后单击确定。
- Right-click the newly created "Commerce > Controllers" folder, and choose "Add > Controller..."
3.右键单击新创建的“Commerce> Controllers”文件夹,然后选择“添加>控制器...”
- Name the Controller "HomeController"
4.将Controller命名为“HomeController”
- Right-click on the "Index()" method name and choose "Add View..."
5.右键单击“Index()”方法名称,然后选择“添加视图...”
- Selected the "Create a partial view" option and click Add
6.选择“创建局部视图”选项,然后单击添加
- Add the following HTML to the View page:
<p>Hello World</p>
7.将以下HTML添加到View页面:<p> Hello World </ p>
- Add the following namespace imports to the HelloController.cs file:
8.将以下命名空间导入添加到HelloController.cs文件中:
    using Orchard.Themes;

    using Orchard.UI.Navigation;
- Add a
[Themed]attribute to the HelloController class:
9.在HelloController类中添加[Themed]属性:
    namespace Orchard.Web.Areas.Commerce.Controllers {

        [Themed]

        public class HomeController : Controller
- Add another class to create a new Menu item:
10.添加另一个类以创建新的菜单项:
    public class MainMenu : INavigationProvider {

        public String MenuName {

            get { return "main"; }

        }

        public void GetNavigation(NavigationBuilder builder)

        {

            builder.Add(menu =>

                    menu.Add("Shop", "4", item => item

                        .Action("Index", "Home", new { area = "Commerce" })));

        }

    }