第2部分:让小工具动态化-Part 2: Make the Widget Dynamic
Introduction
介绍
This is part two of a four part course. It will get you started with a gentle introduction to extending Orchard at the code level. You will build a very simple module which contains a widget that shows an imaginary featured product.
这是四部分课程的第二部分。它将帮助您轻松介绍在代码级别扩展Orchard。您将构建一个非常简单的模块,其中包含一个显示虚构特色产品的小部件。
It will teach you some of the basic components of module development and also encourage you to use best-practices when developing for Orchard.
它将教您模块开发的一些基本组件,并鼓励您在开发Orchard时使用最佳实践。
If you haven't read the previous part of this course then you can go back to the overview to learn about the Getting Started with Modules course.
如果您还没有阅读本课程的前一部分,那么您可以回到概述[了解模块入门课程](模块入门)。
Expanding the widget to make it more dynamic
扩展小部件以使其更具动态性
In the first version of the widget we took the bare minimum of steps that we could in order to get something up and running.
在小部件的第一个版本中,我们采取了最少的步骤,以便启动和运行。
This meant we missed out a few classes that would be in a normal data-driven module and some of the classes we did add were pretty much empty.
这意味着我们错过了一些将在普通数据驱动模块中的类,并且我们添加的一些类几乎是空的。
Now that you understand the basic workflow of building a module we're going to go back and take a second look at it, adding in some new classes and expanding out the Widget.
现在您已经了解了构建模块的基本工作流程,我们将返回并再次查看它,添加一些新类并扩展Widget。
By the time we have finished with this part we will have made the widget more dynamic. To achieve this goal we are going to:
当我们完成这部分时,我们将使小部件更具动态性。为实现这一目标,我们将:
-
Add a
Booleanproperty to signify if the item is on sale. -
添加“布尔”属性以表示该项目是否在售。 *
-
Dip into the Orchard API to hide the widget if the page we are viewing is the featured product.
-
如果我们正在查看的页面是特色产品,请进入Orchard API以隐藏小部件。 *
Getting setup for the lesson
获取课程设置
You should have already completed part one of this course before you move on to this part. This means you should have a copy of Orchard with the completed module work.
在继续本部分之前,您应该已经完成了本课程的第一部分。这意味着您应该拥有完成模块工作的Orchard副本。
If you have the original Solution and module files available then:
如果您有原始的解决方案和模块文件,则:
- Open Visual Studio
1.打开Visual Studio
- Open the Solution you created in the first part of the course
1.打开您在课程第一部分中创建的解决方案
If for some reason you don't have these files you can play catch-up by following these steps:
如果由于某种原因您没有这些文件,您可以按照以下步骤进行追赶:
- Follow the setting up for a lesson guide.
1.按照[设置课程](设置课程)指南进行操作。
- Download the completed module source code from part 1.
1.下载[第1部分中已完成的模块源代码](../ Attachments / getting-started-with-modules-part-1 / Orchard.LearnOrchard.FeaturedProduct-Part1-v1.0.zip)。
- Extract the archive into the modules directory at
.\src\Orchard.Web\Modules\.
1.将存档解压缩到。\\ src \\ Orchard.Web \\ Modules \\的modules目录中。
- Run Orchard by pressing
Ctrl-F5, go to the admin dashboard, select Modules from the navigation menu and enable the module.
1.按“Ctrl-F5”运行Orchard,进入管理仪表板,从导航菜单中选择 Modules 并启用模块。
Now we can begin the lesson by starting to build in database functionality to the Featured Product module.
现在,我们可以开始为特色产品模块构建数据库功能。
Add a ContentPartRecord class
添加ContentPartRecord类
In the first part of this course we created a simple ContentPart class called FeaturedProductPart. Because we weren't storing anything at the time this class was just an empty placeholder.
在本课程的第一部分中,我们创建了一个名为FeaturedProductPart的简单ContentPart类。因为我们当时没有存储任何东西,所以这个类只是一个空的占位符。
We are going to go back and give it a property to store some data in the next section but first we need to create a ContentPartRecord class.
我们将返回并给它一个属性来存储下一节中的一些数据,但首先我们需要创建一个ContentPartRecord类。
The ContentPartRecord class is used by Orchard to store content part data in a database.
Orchard使用ContentPartRecord类将内容部分数据存储在数据库中。
Let's add the class to the module and then start wiring in the Boolean IsOnSale property:
让我们将类添加到模块中,然后在Boolean``IsOnSale属性中开始连接:
- Locate your FeaturedProduct module in the Solution Explorer, Right click on the
Modelsfolder and choose Add, Class...
1.在解决方案资源管理器中找到您的FeaturedProduct模块,_右键单击Models文件夹并选择 Add , Class ...
- In the Add New Item dialog enter
FeaturedProductPartRecordin to the Name: field and press Add.
1.在 Add New Item 对话框中,在'Name:字段中输入FeaturedProductPartRecord并按 Add **。
- Derive the class from
ContentPartRecord:
1.从ContentPartRecord派生类:
public class FeaturedProductPartRecord : ContentPartRecord
- Add the namespace by pressing
Ctrl-.:
1.按“Ctrl-。”添加命名空间:

- Add a public property to the class. Place your cursor in the main body of the class. Type
propthen press theTabkey twice:
1.向该类添加公共属性。将光标放在类的主体中。键入prop然后按两次“Tab”键:

This will insert a code snippet for an automatically implemented public property.
- In the first placeholder (you can just start typing and it will replace the
intautomatically) set it tovirtual boolthen pressTab, typeIsOnSaleand pressEnterto complete the property.
1.在第一个占位符(你可以开始输入并自动替换int)将其设置为virtual bool然后按Tab,键入IsOnSale并按Enter来完成属性。

The important thing to remember for your ContentPartRecord classes is that each of the properties you want to store in the database should be marked with the virtual keyword. This is so that NHibernate, the database system used by Orchard, can inject its underlying plumbing.
要记住ContentPartRecord类的重要一点是,要存储在数据库中的每个属性都应使用virtual关键字标记。这是因为Orchard使用的数据库系统NHibernate可以注入其底层管道。
You should now end up with a file called .\Models\FeaturedProductPartRecord.cs with the contents:
您现在应该得到一个名为。\\ Models \\ FeaturedProductPartRecord.cs的文件,内容如下:
using Orchard.ContentManagement.Records;


namespace Orchard.LearnOrchard.FeaturedProduct.Models {

  public class FeaturedProductPartRecord : ContentPartRecord {

    public virtual bool IsOnSale { get; set; }

  }

}
Update the ContentPart
更新ContentPart
You now have a class that will provide the interface between your database and your content part (FeaturedProductPartRecord).
您现在有一个类,它将提供数据库和内容部分之间的接口(FeaturedProductPartRecord)。
The first change to the content part will be to let it know about this record class. Then we will add a public property which mirrors the data class and specifies how it will store its data:
对内容部分的第一个更改是让它知道这个记录类。然后我们将添加一个镜像数据类的公共属性,并指定它将如何存储其数据:
- Open the
ContentPartfile located in.\Models\FeaturedProductPart.cs
1.打开位于。\\ Models \\ FeaturedProductPart.cs中的ContentPart文件
- Add a generic type parameter to the
FeaturedProductPartclass by changing this:
1.通过更改以下内容,将一个泛型类型参数添加到FeaturedProductPart类:
     public class FeaturedProductPart : ContentPart


 To this:


     public class FeaturedProductPart : ContentPart<FeaturedProductPartRecord>
- Add the public property to the class:
1.将公共属性添加到类中:
      [DisplayName("Is the featured product on sale?")]

      public bool IsOnSale {

        get { return Retrieve(r => r.IsOnSale); }

        set { Store(r => r.IsOnSale, value); }

      }
- Add the namespace for the
DisplayNameattribute
1.添加DisplayName属性的命名空间
The DisplayName attribute is a feature provided by ASP.NET MVC. Later on when we build the editor view for the admin dashboard it will use this phrase instead of simply displaying "IsOnSale"
DisplayName属性是ASP.NET MVC提供的功能。稍后,当我们为管理仪表板构建编辑器视图时,它将使用此短语而不是简单地显示“IsOnSale”
You should now end up with a FeaturedProductPart.cs file that looks like this:
您现在应该得到一个如下所示的FeaturedProductPart.cs文件:
using System.ComponentModel;

using Orchard.ContentManagement;
namespace Orchard.LearnOrchard.FeaturedProduct.Models {

  public class FeaturedProductPart : ContentPart<FeaturedProductPartRecord> {

    [DisplayName("Is the featured product on sale?")]

    public bool IsOnSale {

      get { return Retrieve(r => r.IsOnSale); }

      set { Store(r => r.IsOnSale, value); }

    }

  }

}
The Retrieve() and Store() methods come when you inherit from ContentPart<T>.
当你继承自ContentPart <T>时,会出现Retrieve()和Store()方法。
Under the hood your data is stored in two places. There is the underlying database and something called the infoset.
在引擎盖下,您的数据存储在两个地方。底层的_database_和一些名为_infoset_的东西。
Understanding data storage in Orchard
了解Orchard中的数据存储
Orchard provides an incredibly modular architecture. The way it achieves this is that it breaks everything up into their own little components called content parts. We are busy building one of these content parts right now. Orchard composes these together at run-time to form content types, such as the widget we are working on.
Orchard提供令人难以置信的模块化架构。它实现这一目标的方式是将所有内容分解为自己的称为内容部分的小组件。我们正忙着构建其中一个内容部分。 Orchard在运行时将这些组合在一起以形成内容类型,例如我们正在处理的小部件。
In order to store all of these little pieces of data in the database they are split up into many tables. There can be a lot of SQL JOIN's involved with pulling a content item out of the database. This means things aren't always as fast as they could be.
为了将所有这些小块数据存储在数据库中,它们被分成许多表。将内容项从数据库中拉出可能会涉及很多SQLJOIN。这意味着事情并不总是那么快。
To minimize these effects a secondary data cache is kept. All of the different content parts are encoded into XML and stored in a single column inside a database table. For example, our widget looks something like this:
为了最小化这些影响,保留了辅助数据缓存。所有不同的内容部分都被编码为XML并存储在数据库表中的单个列中。例如,我们的小部件看起来像这样:
<Data>

  <IdentityPart Identifier="0e8f0d480f0d4d4bb72ad3d0c756a0d4" />

  <CommonPart CreatedUtc="2015-09-24T19:37:19.5819846Z"

    ModifiedUtc="2015-09-24T19:37:19.6720488Z"

    PublishedUtc="2015-09-24T19:37:19.6810555Z" />

  <WidgetPart RenderTitle="true" Title="Featured Product" Position="1"

    Zone="AsideFirst" Name="" CssClasses="" />

</Data>
So instead of pulling data from three different tables (IdentityPart, CommonPart and WidgetPart) Orchard just selects the single XML block and checks in there. The Retrieve() and Store() methods automatically keep this data and the individual database tables in sync for you.
因此,Orchard不是从三个不同的表(IdentityPart,CommonPart和WidgetPart)中提取数据,而是选择单个XML块并在那里进行检查。 Retrieve()和Store()方法自动保持这些数据和各个数据库表同步。
Why not just use the XML infoset all the time? If you need to sort the data or filter it then its actually quicker to do this all within the SQL database server rather than extracting everything and sorting / filtering it after.
为什么不一直只使用XML信息集?如果您需要对数据进行排序或对其进行过滤,那么在SQL数据库服务器中执行此操作实际上更快,而不是提取所有内容并对其进行排序/过滤。
In certain scenario's you might not need one or the other of these data stores. There are more advanced approaches that you can take in these situations but that's an advanced topic for a later guide.
在某些情况下,您可能不需要这些数据存储中的一个或另一个。在这些情况下,您可以采用更多高级方法,但这是后续指南的高级主题。
This changeover was implemented in Orchard v1.8 and was known as "The Shift". Bertrand Le Roy has written more about this on his blog.
这种转换在Orchard v1.8中实现,被称为“The Shift”。 Bertrand Le Roy [在他的博客上写了更多关于此的内容](http://weblogs.asp.net/bleroy/the-shift-how-orchard-painlessly-shifted-to-document-storage-and-how-it- LL-影响-你)。
Upgrading using a data migration
使用数据迁移进行升级
In the first part of this course we created a Migrations.cs class file. Inside it we wrote the Create() method which returned 1. When Orchard had finished running the method it stored that 1 in the database.
在本课程的第一部分中,我们创建了一个Migrations.cs类文件。在里面我们编写了Create()方法,它返回了1。当Orchard完成运行该方法后,它在数据库中存储了1。
Now that we want to make some changes to our modules data storage (we want to add in a table for the data to be stored in) we can add a new method UpdateFrom1(). Orchard will automatically find this method the next time the site is loaded and run this updated data migration.
现在我们要对模块数据存储进行一些更改(我们想在表中添加要存储的数据),我们可以添加一个新方法UpdateFrom1()。 Orchard将在下次加载站点时自动找到此方法并运行此更新的数据迁移。
At the end of the update method we will return 2. This means in the future if we want to make further changes we could add an UpdateFrom2() method. We can keep returning a number one higher than the previous to update as many times as we need.
在更新方法结束时,我们将返回2。这意味着将来如果我们想进行进一步的更改,我们可以添加一个UpdateFrom2()方法。我们可以保持比前一个更高的返回值,以便根据需要多次更新。
- Open the
Migrations.csfile in the root folder of the module.
1.打开模块根文件夹中的Migrations.cs文件。
- Beneath the
Create()method, add in the following method:
1.在Create()方法下面,添加以下方法:
    public int UpdateFrom1() {

      SchemaBuilder.CreateTable(typeof(FeaturedProductPartRecord).Name,

        table => table

          .ContentPartRecord()

          .Column<bool>("IsOnSale"));

      return 2;

    }
To start off with we are using the SchemaBuilder class to create a new table. The first parameter is the table name. This should match the ContentPartRecord we built.
首先,我们使用SchemaBuilder类创建一个新表。第一个参数是表名。这应该与我们构建的ContentPartRecord匹配。
Instead of pulling it out using
typeof().Nameyou could pass in a string such asCreateTable("FeaturedProductsPartRecord", ...);but that leaves you open to introducing small typos into the code - like I did just then.你可以传入一个字符串,例如
CreateTable(“FeaturedProductsPartRecord”,...);而不是使用typeof()。Name`来传递它。但是这让你开始在代码中引入小错别字 - 就像我做的那样就在此刻。
Did you notice the extra
sI accidentally typed into the table name?你是否注意到我不小心输入了表名的额外
s?
If you make a mistake like this then you won't get an exception. Orchard will still run but your data will be saved to the wrong table creating hard to find bugs.
如果你犯了这样的错误,你就不会得到例外。 Orchard仍会运行,但您的数据将保存到错误的表中,从而导致很难找到错误。
The ContentPartRecord() call is just a simple shorthand to add in the id column. If you look in the definition (just place your cursor in the method in Visual Studio and press F12) you will see it simply adds an extra Column<> into the chain:
ContentPartRecord()调用只是在id列中添加的简单简写。如果您查看定义(只需将光标放在Visual Studio中的方法并按下F12),您将看到它只是在链中添加了一个额外的Column <>:
Column<int>("Id", column => column.PrimaryKey().NotNull());
We then add our column with a data type bool and a name IsOnSale which matches our property on the record class. NHibernate will automatically match the name of the property on the record class with the column in the database.
然后,我们使用数据类型bool和名称IsOnSale添加我们的列,该列匹配记录类的属性。 NHibernate会自动将记录类上的属性名称与数据库中的列匹配。
Bonus Exercise: Look around in the
Migrations.csfiles located in the other built-in modules for many examples of the things you can do with this class.奖励练习:查看位于其他内置模块中的
Migrations.cs文件,了解您可以使用此类完成的许多示例。
To do this just select the Search Solution Explorer textbox at the top of the Solution Explorer or press
Ctrl-;. When it's selected just typeMigrations.csin and it will find all of theMigrations.csfiles in the solution.要执行此操作,只需在 Solution Explorer 顶部选择 Search Solution Explorer 文本框,或按
Ctrl-;。当它被选中时只需键入Migrations.cs,它将找到解决方案中的所有Migrations.cs文件。
You should now end up with a Migrations.cs file that looks like this:
您现在应该得到一个如下所示的Migrations.cs文件:
using Orchard.ContentManagement.MetaData;

using Orchard.Core.Common.Models;

using Orchard.Data.Migration;

using Orchard.LearnOrchard.FeaturedProduct.Models;

using Orchard.Widgets.Models;


namespace Orchard.LearnOrchard.FeaturedProduct {

  public class Migrations : DataMigrationImpl {

    public int Create() {

      ContentDefinitionManager.AlterTypeDefinition(

        "FeaturedProductWidget", cfg => cfg

        .WithSetting("Stereotype", "Widget")

        .WithPart(typeof(FeaturedProductPart).Name)

        .WithPart(typeof(CommonPart).Name)

        .WithPart(typeof(WidgetPart).Name));


      return 1;

    }


    public int UpdateFrom1() {

      SchemaBuilder.CreateTable(typeof(FeaturedProductPartRecord).Name,

        table => table

          .ContentPartRecord()

          .Column<bool>("IsOnSale"));


      return 2;

    }

  }

}
Add a handler
添加处理程序
The plumbing for connecting the module code to the database is almost complete. The last thing to do is to register a StorageFilter for the ContentPartRecord.
用于将模块代码连接到数据库的管道几乎已完成。最后要做的是为ContentPartRecord注册一个StorageFilter。
The StorageFilter class takes care of persisting the data from repository object to the database. In this case it's the FeaturedProductPartRecord class that needs registering.
StorageFilter类负责将数据库从存储库对象持久化到数据库。在这种情况下,它是需要注册的FeaturedProductPartRecord类。
You do this registration inside the Handler class, although that's not it's only use. You can think of the handler like a filter in ASP.NET MVC. It's a piece of code that is meant to run when specific events happen in the application, but that are not specific to a given content type.
你在Handler类中进行了这个注册,虽然这不是它的唯一用途。您可以将处理程序视为ASP.NET MVC中的过滤器。它是一段代码,用于在应用程序中发生特定事件时运行,但不是特定于给定内容类型。
For example, you could build an analytics module that listens to the Loaded event in order to log usage statistics.
例如,您可以构建一个侦听“Loaded”事件的分析模块,以便记录使用情况统计信息。
If you're curious, you can see what event handlers you can override in your own handlers by examining the source code for
ContentHandlerBaseand reading the understanding content handlers guide.如果您感到好奇,可以通过检查“ContentHandlerBase”的源代码并阅读[了解内容处理程序](/ Documentation / Understanding-content-handlers)指南,了解您可以在自己的处理程序中覆盖哪些事件处理程序。
The handler you need in this module is not going to be very complex, but it will implement some plumbing that is necessary to set up the persistence of the part:
您在此模块中需要的处理程序不会非常复杂,但它将实现一些设置部件持久性所必需的管道:
- In the Solution Explorer, right click on the
Orchard.LearnOrchard.FeaturedProductproject and choose Add, New Folder and create a new folder calledHandlers.
1.在 Solution Explorer 中,右键单击Orchard.LearnOrchard.FeaturedProduct项目并选择 Add , New Folder 并创建一个名为Handlers的新文件夹。
- Now right click on the
Handlersfolder and choose Add, Class....
1.现在右键单击Handlers文件夹并选择 Add , Class ... 。
- In the Add New Item dialog enter
FeaturedProductHandlerin to theName:field and press Add.
1.在 Add New Item 对话框中,在Name:字段中输入FeaturedProductHandler并按 Add 。
- Derive the class from
ContentHandler:
1.从ContentHandler派生类:
public class FeaturedProductHandler : ContentHandler
- Add the namespace by pressing
Ctrl-.:
1.按“Ctrl-。”添加命名空间:

- You now need to add in the standard boilerplate handler constructor code which wires up the
StorageFilterto the repository:
1.您现在需要添加标准样板处理程序构造函数代码,该代码将StorageFilter连接到存储库:
    public FeaturedProductHandler(

      IRepository<FeaturedProductPartRecord> repository) {

        Filters.Add(StorageFilter.For(repository));

    }
- Add the namespace for the
FeaturedProductPartRecordand then theIRepository<>.
1.为FeaturedProductPartRecord添加命名空间,然后添加IRepository <>。
You should now end up with a FeaturedProductHandler.cs file that looks like this:
您现在应该得到一个如下所示的FeaturedProductHandler.cs文件:
using Orchard.ContentManagement.Handlers;

using Orchard.Data;

using Orchard.LearnOrchard.FeaturedProduct.Models;


namespace Orchard.LearnOrchard.FeaturedProduct.Handlers {

  public class FeaturedProductHandler : ContentHandler {

    public FeaturedProductHandler(

      IRepository<FeaturedProductPartRecord> repository) {

        Filters.Add(StorageFilter.For(repository));

    }

  }

}
Update the driver to support an editor view
更新驱动程序以支持编辑器视图
This time through with the driver it's going to get its other two core boilerplate methods.
这次通过驱动程序,它将获得其他两个核心样板方法。
The first is a method called Editor() which is used to build the shape which will display the edit interface in the admin dashboard. This is designed to be used with a HTTP GET request.
第一个是名为Editor()的方法,用于构建将在管理仪表板中显示编辑界面的形状。这旨在与HTTPGET请求一起使用。
The second is another Editor() overload which takes the submitted information from the first and attempts to pass that information back into the database. This is designed to be used with a HTTP POST request.
第二个是另一个Editor()重载,它从第一个获取提交的信息,并尝试将该信息传递回数据库。这旨在与HTTPPOST请求一起使用。
- Open the
FeaturedProductDriver.csclass which is in the.\Drivers\folder of the module project.
1.打开模块项目的。\\ Drivers \\文件夹中的FeaturedProductDriver.cs类。
- Below the
Display()method, paste in this block of code:
1.在Display()方法下面,粘贴这段代码:
    protected override DriverResult Editor(FeaturedProductPart part,

      dynamic shapeHelper) {

        return ContentShape("Parts_FeaturedProduct_Edit",

          () => shapeHelper.EditorTemplate(

            TemplateName: "Parts/FeaturedProduct",

            Model: part,

            Prefix: Prefix));

    }
    protected override DriverResult Editor(FeaturedProductPart part,

      IUpdateModel updater, dynamic shapeHelper) {

        updater.TryUpdateModel(part, Prefix, null, null);

        return Editor(part, shapeHelper);

    }
- Add the namespace for
IUpdateModelusing theCtrl-.keyboard shortcut.
1.使用Ctrl-.键盘快捷键添加IUpdateModel的命名空间。
As explained above, the first Editor() method is for displaying an edit form in the admin dashboard. You can see that it returns a content shape called Parts_FeaturedProduct_Edit. We will use this information later on when updating the Placement.info.
如上所述,第一个Editor()方法用于在管理仪表板中显示编辑表单。您可以看到它返回一个名为Parts_FeaturedProduct_Edit的内容形状。稍后我们将在更新Placement.info时使用此信息。
The way it does it is by using the provided shapeHelper factory to create a new shape for the current content part (our FeaturedProductPart with the bool IsOnSale property). This is the same shape factory we used in our Display() method the first time around.
它的工作方式是使用提供的shapeHelper工厂为当前内容部分创建一个新形状(我们的FeaturedProductPart具有bool IsOnSale属性)。这是我们第一次使用Display()方法时使用的相同形状工厂。
For editor views you use the .EditorTemplate() method and pass in the configuration values. By default, Orchard places all of its editor views in the EditorTemplates folder. Combining this with the TemplateName parameter we know that we will be creating a view called .\Views\EditorTemplates\Parts\FeaturedProduct.cshtml in the next section.
对于编辑器视图,使用.EditorTemplate()方法并传入配置值。默认情况下,Orchard将其所有编辑器视图放在EditorTemplates文件夹中。将它与TemplateName参数结合起来,我们知道我们将在下一节中创建一个名为。\\ Views \\ EditorTemplates \\ Parts \\ FeaturedProduct.cshtml的视图。
The Model parameter passes in the data, in our case a data structure that includes the IsOnSale value. This will be accessible inside the Razor view and we will use it to determine what to display.
Model参数传入数据,在我们的例子中是一个包含IsOnSale值的数据结构。这将在Razor视图中访问,我们将使用它来确定要显示的内容。
The Prefix is a text value that is prepended to the names of the shapes internally. This makes sure that the names are unique. The Prefix value that we supply is a method that comes with deriving from ContentPartDriver that just uses a typeof() to get the name of the class:
“前缀”是一个文本值,它在内部添加到形状的名称之前。这可确保名称是唯一的。我们提供的Prefix值是一个派生自ContentPartDriver的方法,它只使用typeof()来获取类的名称:
protected virtual string Prefix { get { return typeof(TContent).Name; } }
In more complicated projects this method can combine multiple shapes together and return them as a single
CombinedShape.在更复杂的项目中,此方法可以将多个形状组合在一起,并将它们作为单个“CombinedShape”返回。
The second overload of the Editor() method is used when the administrator submits a page that has the EditorTemplate form inside it. You can see the bare minimum code here which just attempts to pass the form data to the correct internal model. As long as it doesn't have any errors the model will then be persisted to the database automatically by Orchard.
当管理员提交其中包含EditorTemplate表单的页面时,使用Editor()方法的第二个重载。您可以在此处看到最小的代码,它只是尝试将表单数据传递给正确的内部模型。只要没有任何错误,Orchard就会自动将模型持久保存到数据库中。
It then calls the original POST version of the Editor() method with the form data already included in the model. This means that after the form has been submitted and the page loads up again it will have the form fields pre-populated with the data that has been entered.
然后它使用已包含在模型中的表单数据调用Editor()方法的原始POST版本。这意味着在提交表单并再次加载页面后,它将预先填充已输入数据的表单字段。
In more complicated projects you will see further processing being completed after the
TryUpdateModel()call.在更复杂的项目中,您将看到在
TryUpdateModel()调用之后完成的进一步处理。
Don't forget, browsing the Orchard source code is an invaluable tool to learn more about its inner workings. A good reference module for both this and the last tip is the
WidgetPartDriverlocated in.\Orchard.Web\Modules\Orchard.Widgets\Drivers\WidgetPartDriver.cs. It shows both the combining of shapes and extra validation in the editor update method.不要忘记,浏览Orchard源代码是了解其内部工作原理的宝贵工具。这个和最后一个提示的一个很好的参考模块是位于
。\\ Orchard.Web \\ Modules \\ Orchard.Widgets \\ Drivers \\ WidgetPartDriver.cs中的WidgetPartDriver。它在编辑器更新方法中显示了形状和额外验证的组合。
You should now end up with a FeaturedProductDriver.cs file that looks like this:
您现在应该得到一个如下所示的FeaturedProductDriver.cs文件:
using Orchard.ContentManagement;

using Orchard.ContentManagement.Drivers;

using Orchard.LearnOrchard.FeaturedProduct.Models;


namespace Orchard.LearnOrchard.FeaturedProduct.Drivers {

  public class FeaturedProductDriver : ContentPartDriver<FeaturedProductPart> {

    protected override DriverResult Display(FeaturedProductPart part, string displayType, dynamic shapeHelper) {

      return ContentShape("Parts_FeaturedProduct", () => shapeHelper.Parts_FeaturedProduct());

    }


    protected override DriverResult Editor(FeaturedProductPart part, dynamic shapeHelper) {

      return ContentShape("Parts_FeaturedProduct_Edit",

        () => shapeHelper.EditorTemplate(

          TemplateName: "Parts/FeaturedProduct",

          Model: part,

          Prefix: Prefix));

    }


    protected override DriverResult Editor(FeaturedProductPart part, IUpdateModel updater, dynamic shapeHelper) {

      updater.TryUpdateModel(part, Prefix, null, null);

      return Editor(part, shapeHelper);

    }

  }

}
Add the EditorTemplate view
添加EditorTemplate视图
The editor template view uses the same underlying technology as the front-end view, a Razor view template. Orchard keeps all of its editor templates inside the EditorTemplates folder of the Views folder.
编辑器模板视图使用与前端视图相同的基础技术,即Razor视图模板。 Orchard将所有编辑器模板保存在Views文件夹的EditorTemplates文件夹中。
When you're building the administration form you will normally use many of the ASP.NET MVC helper methods such as @Html.CheckBoxFor(model => model.IsOnSale).
在构建管理表单时,通常会使用许多ASP.NET MVC辅助方法,例如@ Html.CheckBoxFor(model => model.IsOnSale)。
For this reason you will find that editor template views are strongly-typed views and start off with the @model command. This will mean that you get the IntelliSense while using model to build the forms.
因此,您会发现编辑器模板视图是强类型视图,并从@ model命令开始。这意味着您在使用model构建表单时获得了IntelliSense。
The editor form for this module will have a single section to represent the Boolean value that we have added to the model. When building the view you should wrap each form item inside a <fieldset> tag.
此模块的编辑器表单将有一个部分来表示我们添加到模型中的布尔值。构建视图时,应将每个表单项包装在<fieldset>标记内。
Add the EditorTemplate view by following these steps:
按照以下步骤添加EditorTemplate视图:
- Add a new folder inside the
Viewsfolder calledEditorTemplates(Right clickon theViewfolder in the solution explorer, clickAdd,New Folderand typeEditorTemplates).
1.在Views文件夹中添加一个名为EditorTemplates的新文件夹(在解决方案资源管理器中的View文件夹上`右键单击,单击添加,新文件夹并输入EditorTemplates)。
- Add another folder inside that called
Parts.
1.在名为Parts的内部添加另一个文件夹。
- Add a new
.cshtmlRazor view within thePartsfolder calledFeaturedProduct.cshtml
1.在Parts文件夹中添加一个名为FeaturedProduct.cshtml的新``.cshtml Razor视图。
- Within the
FeaturedProduct.cshtmlview file add the following HTML markup:
1.在FeaturedProduct.cshtml视图文件中添加以下HTML标记:
      @model Orchard.LearnOrchard.FeaturedProduct.Models.FeaturedProductPart


      <fieldset>

        <div class="editor-label">

          @Html.LabelFor(model => model.IsOnSale)

        </div>

        <div class="editor-field">

          @Html.CheckBoxFor(model => model.IsOnSale)

          @Html.ValidationMessageFor(model => model.IsOnSale)

        </div>

      </fieldset>
When you edit the widget in the admin dashboard you will see a simple edit form:
在管理仪表板中编辑窗口小部件时,您将看到一个简单的编辑表单:
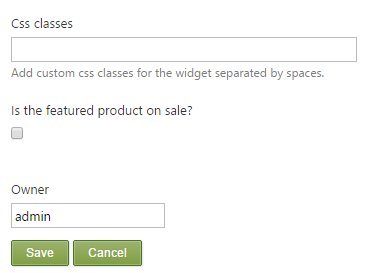
You can see that it is automatically pulling through the [DisplayName] attribute value that we used earlier.
您可以看到它正在自动拉出我们之前使用的[DisplayName]属性值。
Update the front-end view
更新前端视图
Now that we have gone through all the steps to surface the IsOnSale property we can finally use it to make a decision in the front-end view.
现在我们已经完成了表示IsOnSale属性的所有步骤,我们最终可以使用它来在前端视图中做出决定。
If you have experience with normal ASP.NET MVC Razor views you will know that you can blend your C# code in with the HTML including features such as using conditional statements to control the visibility of certain sections.
如果您有使用普通ASP.NET MVC Razor视图的经验,您将知道可以将您的`C#'代码与HTML混合,包括使用条件语句来控制某些部分的可见性等功能。
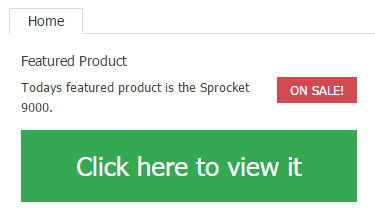
We will now update the module to show a red "ON SALE!" box in the widget when IsOnSale is set to true:
我们现在将更新模块以显示红色“ON SALE!”当IsOnSale设置为'true`时,窗口小部件中的框:
- Open up the view file located at
.\Views\Parts\FeaturedProduct.cshtml
1.打开位于。\\ Views \\ Parts \\ FeaturedProduct.cshtml的视图文件
- Copy this CSS snippet into the
<style>block at the top of the view:
1.将此CSS片段复制到视图顶部的<style>块中:
    .sale-red {

      background-color: #d44950;

      color: #fff;

      float: right;

      padding: .25em 1em;

      display: inline;

    }
- Add this snippet in to the main body, above the first
<p>tag:
1.将此代码段添加到主体中,位于第一个“ ”标记上方:
    @if (Model.ContentPart.IsOnSale) {

      <p class="sale-red">ON SALE!</p>

    }
You will notice that this view doesn't feature an @model directive at the top. This is because the model is a dynamic class which contains the content part information and various other properties supplied by Orchard. This means that you can't define it in the view beforehand as the class isn't a named type and IntelliSense doesn't know what properties are going to be available at run-time.
您会注意到此视图顶部没有“@ model”指令。这是因为模型是一个动态类,它包含Orchard提供的内容部分信息和各种其他属性。这意味着您无法事先在视图中定义它,因为该类不是命名类型,并且IntelliSense不知道在运行时哪些属性可用。
Because of this you are on your own when typing up the views. It can be helpful to add breakpoints to inspect the structure of the model at run-time if you don't know what value you're looking for.
因此,在输入视图时,您可以自己动手。如果您不知道要查找的值,那么在运行时添加断点来检查模型的结构会很有帮助。
The @if (Model.ContentPart.IsOnSale) { } line simply checks if the value is true and if so it dynamically shows the HTML contained within the curly braces, displaying a red "ON SALE!" banner within the widget.
@if(Model.ContentPart.IsOnSale){}行只检查值是否为真,如果是,则动态显示大括号内的HTML,显示红色的“ON SALE!”小部件内的横幅。
You should now have a FeaturedProduct.cshtml file that looks like this:
你现在应该有一个FeaturedProduct.cshtml文件,如下所示:
<style>

  .btn-green {

    padding: 1em;

    text-align: center;

    color: #fff;

    background-color: #34A853;

    font-size: 2em;

    display: block;

  }

  .sale-red {

    background-color: #d44950;

    color: #fff;

    float: right;

    padding: .25em 1em;

    display: inline;

  }

</style>

@if (Model.ContentPart.IsOnSale) {

  <p class="sale-red">ON SALE!</p>

}

<p>Todays featured product is the Sprocket 9000.</p>

<p><a href="/sprocket-9000" class="btn-green">Click here to view it</a></p>
Update the Placement.info file
更新Placement.info文件
Before we run the module to see our updated widget in action we need to make a change to the placement.info file. The module should run without errors at this stage but until we set up a <place> for the editor template you won't be able to configure the IsOnSale variable.
在我们运行模块以查看我们更新的小部件之前,我们需要对placement.info文件进行更改。模块应该在这个阶段运行没有错误,但在我们为编辑器模板设置<place>之前,你将无法配置IsOnSale变量。
- Open the
Placement.infofile located in the root folder of the module.
1.打开位于模块根文件夹中的Placement.info文件。
- Within the
<placements>tag add the following<place>tag:
1.在<placements>标签内添加以下<place>标签:
    <Place Parts_FeaturedProduct_Edit="Content:7.5"/>


 The order of the `<place>` tags doesn't matter.
The name of the place that we are targeting Parts_FeaturedProduct_Edit was defined in the driver class when we configured it in the EditorTemplate() shape factory method. The shape will be injected into the local zone named "content" with a weight of 7.5. In this case the weight of 7.5 will move it down to the bottom of the form.
当我们在EditorTemplate()形状工厂方法中配置它时,我们以Parts_FeaturedProduct_Edit为目标的地方的名称是在驱动程序类中定义的。该形状将注入名为“content”的本地区域,权重为7.5。在这种情况下,7.5的重量会将其向下移动到表格的底部。
When developing your modules it is common to forget this last stage. While you might not always be able to remember to update the
Placement.infobefore you run, you should take a moment to remember the solution.在开发模块时,通常会忘记最后一个阶段。虽然您可能无法始终记得在运行之前更新“Placement.info”,但您应该花点时间记住解决方案。
Whenever the shape isn't displayed where it was expected, think of
Placement.infofirst.每当形状没有显示在预期的位置时,首先考虑“Placement.info”。
You should now have a Placement.info file that looks like this:
您现在应该有一个如下所示的Placement.info文件:
<Placement>

  <Place Parts_FeaturedProduct="Content:1"/>

  <Place Parts_FeaturedProduct_Edit="Content:7.5"/>

</Placement>
Trying the module out in Orchard
在Orchard尝试模块
Great! You have completed another stage of the development. Now its time to load the website up in the browser and play with the new feature you just built.
大!您已经完成了另一个开发阶段。现在是时候在浏览器中加载网站并使用您刚构建的新功能。
- Within Visual Studio, press
Ctrl-F5on your keyboard to start the website without debugging enabled (it's quicker and you can attach the debugger later if you need it).
1.在Visual Studio中,按键盘上的“Ctrl-F5”启动网站而不启用调试(它更快,如果需要,可以稍后附加调试器)。
- Navigate to the admin dashboard.
1.导航到管理仪表板。
- Click Widgets in the side menu.
1.单击侧面菜单中的小部件。
- If you follow the guide correctly in part 1, you should see your Featured Product Widget in the list under
AsideFirst. Click on the word Featured Product (this may vary depending the title you entered when you set the widget up):
1.如果您在第1部分中正确地遵循指南,您应该在“AsideFirst”下的列表中看到您的精选产品小工具。单击单词特色产品(这可能会因您在设置小部件时输入的标题而有所不同):

- The Edit Widget page will be displayed. Scroll down to the bottom to find the setting we added:
1.将显示编辑窗口小部件页面。向下滚动到底部以查找我们添加的设置:

Tick the checkbox.
- Click Save.
1.单击保存。
- Navigate back to the homepage of the website by clicking on the site title in the top corner of the admin dashboard:
1.单击管理仪表板右上角的站点标题,导航回网站的主页:

<font color=#0099ff size=4 face="黑体"></font>
You should now see your product is marked as being on sale:
您现在应该看到您的产品已标记为正在销售中:
Bonus Exercise: Go back into the admin dashboard, uncheck the setting, save and come back again to see how the it no longer shows as being on sale.
奖励练习:返回管理仪表板,取消选中设置,保存并再次返回以查看它不再显示为待售。
Download the code for this lesson
下载本课程的代码
You can download a copy of the module so far at this link:
您可以在此链接下载目前为止的模块副本:
-
Download Orchard.LearnOrchard.FeaturedProduct-Part2-v1.0.zip
-
[下载Orchard.LearnOrchard.FeaturedProduct-Part2-v1.0.zip](../附件/ getting-started-with-modules-part-2 / Orchard.LearnOrchard.FeaturedProduct-Part2-v1.0.zip) *
To use it in Orchard simply extract the archive into the modules directory at .\src\Orchard.Web\Modules\. If you already have the module installed from a previous part then delete that folder first.
要在Orchard中使用它,只需将存档解压缩到。\\ src \\ Orchard.Web \\ Modules \\的modules目录中。如果您已从上一部分安装了模块,则首先删除该文件夹。
For Orchard to recognize it, the folder name should match the name of the module. Make sure that the folder name is
Orchard.LearnOrchard.FeaturedProductand then the modules files are located directly under that.要让Orchard识别它,文件夹名称应与模块名称匹配。确保文件夹名称为“Orchard.LearnOrchard.FeaturedProduct”,然后模块文件直接位于其下。
Conclusion
结论
This part of the course has expanded your knowledge to touch on some of the data storage and content management features in Orchard.
本课程的这一部分将您的知识扩展到了Orchard的一些数据存储和内容管理功能。
You have added in the common module development classes that we didn't cover in the first part. You've experienced using the data migrations to incrementally update your data. You've also seen the basics of creating an admin interface and using it to update the configuration settings of a widget.
您已经添加了我们未在第一部分中介绍的公共模块开发类。您已经体验过使用数据迁移来逐步更新数据。您还看到了创建管理界面并使用它来更新窗口小部件配置设置的基础知识。
You can now see the core process of adding a variable to your module and then implementing it, working successively up the layers to surface it in the admin dashboard and the front-end view.
现在,您可以看到向模块添加变量然后实现变量的核心过程,连续处理层以在管理仪表板和前端视图中显示它。
In the next part of the getting started with modules course we will look at working with content items at the code level.
在模块课程入门的下一部分中,我们将查看[在代码级别使用内容项](Getting-Started-with-Modules-Part-3)。